7 Front Desk Automations Every Racquet Sports Club Should Use
February 5, 2026
Your front desk is the engine room of your racquet and paddle club. It greets members, manages bookings, handles payments, and resolves day-to-day issues — often all at once.
But when everything funnels through the front desk, small inefficiencies add up. Manual follow-ups, extra clicks, and staff juggling too many tasks during peak hours result in slower service, more mistakes, and overwhelmed staff.
Front desk automations help eliminate that friction. In this blog, we’ll walk through seven automations racquet clubs can set up to reduce repetitive tasks, limit human error, and create more consistent workflows, especially when the desk is busy or understaffed.
Front desk automations that make the biggest day-to-day impact
Below is a practical list of front desk automations for racquet clubs, each designed to remove friction from daily operations and give your team room to breathe — even on your busiest days.
Let’s take a look.
1. Membership automations that manage expirations and renewals
Managing memberships by hand often means tracking unpaid dues, monitoring expiration dates, and deciding what happens next — work that usually falls on front desk or admin teams.
Membership automations help handle renewals and expirations automatically by allowing clubs to:
Expire memberships after non-payment Memberships automatically expire after a set number of days if dues aren’t paid.
Cancel memberships after the expiration window Memberships are fully canceled if they aren’t renewed within the defined period.
Transition members to another membership type When a membership auto-cancels, members move into a different tier, such as a free membership.
By setting these rules up front, clubs ensure membership status stays accurate without manual renewal tracking.
Video Transcript
0:00
hello everybody Welcome to today’s webinar thank you so much for joining
0:05
today you guys are in for a special treat we’re going to be going over front desk best practices some tips and tricks
0:13
how to run your organization smoothly from a front desk perspective and you
0:18
guys are even in for even more of a treat because today you are joined by Mr Willie one of our favorites here at
0:24
court Reserve he is known around here as the legend and that is no exaggeration he’s truly awesome he’s Tau me like half
0:30
of what I know which is amazing so you guys are in really good hands um Josh
0:36
I’m going to stop sharing so you can go ahead and get going but yeah we’re going to do like about 30 minutes I guess of
0:43
presentation and then afterwards if you guys have questions we will tackle those as well but Josh without further Ado
0:48
take it away buddy all right perfect hello everybody hope you are doing well today so like Mr wi said here today
0:56
we’re going to be going over some best practices for your front desk staff um
1:02
today I’ll start of sort of start with the more basic actions and then we’ll sort of work our way up along the
1:08
webinar but let me share my screen here and we can get
1:14
started all right perfect so here I have my account up and I think a good way to
1:19
get started here is to show you how we can create a member account from the admin side so if somebody calls in and
1:26
they would like to book a reservation or if somebody is walking into the facility and would like to book a reservation or
1:33
join an event but they don’t have that account created yet we can do that by going to members on the sidebar and we
1:41
can click the add member button right here so from here we’re going to be able
1:47
to fill in like their first name their last name email address gender date of
1:54
birth any information that may be relevant for your organization you know if you are
2:00
setting up events at your facility that are restricted by age or restricted by gender you can make sure you get all of
2:07
that information while you’re creating the members account and from here the
2:13
main thing is when we check off send welcome email to the user this will send
2:19
that member of an email to let them know that an account was created under their email address and from there once they
2:25
get that email they will be able to set up their password and start logging into their own account but from here we can
2:33
also add things like home address if that is needed at your facility if you are an organization that is requiring
2:41
payment profile we can also get that payment profile added while we are creating their account from the admin
2:48
side if you are allowing that eCheck payment profile we will be able to choose that selection and we can also
2:55
use the profile picture feature here as well so if you are using that additional
3:01
feature we can get that picture taken of that member and get that Pro that profile picture added right as we are
3:07
creating their account so from there you know a lot of
3:12
the things that front desk staff will be doing will be managing reservations
3:18
lessons and events that are on schedulers in your organization so the next thing that I will start going over
3:25
are the different types of schedulers that we have in court Reserve so the two different court schedulers
3:33
that we have are the expanded scheduler and the Consolidated scheduler with the expanded scheduler we
3:41
are going to get a column for each individual court that we have in the
3:46
system so if you have 10 courts we’re going to have 10 different columns here and we can see the bookings and the
3:52
availability for each individual court if you are a facility that has
3:58
multiple Court types maybe you offer different sports at your facility another option is going to be the
4:05
Consolidated scheduler where instead of getting a column for each individual
4:10
Court we will get a column for each Court type so maybe you have 20 Courts
4:17
at your facility and just taking a look at 20 columns can be a little bit overwhelming of a view we can instead
4:24
use the Consolidated view we can see each Court type we have in a facility
4:30
and we can see how many spots of availability we have for this specific
4:35
Court time under this court type so that goes over court schedulers
4:42
if you are a facility that has lessons we also have an instructor
4:48
scheduler under the scheduler section and under the scheduler for instructors
4:54
we will get a column for each individual instructor that we have at an organ organization so if somebody is looking
5:02
to book a private lesson and you want to just quickly see what availability each
5:08
of your instructors has this is going to be the best place to just quickly take a look at that
5:16
availability another option that could be set up at your facility is custom
5:22
schedulers so again if you are a facility that has a lot of Courts and
5:27
maybe your organization wants to break those views down into multiple
5:32
custom schedulers that are maybe a little bit easier to manage whenever we
5:38
create a custom scheduler there’s also the option to show that custom scheduler
5:43
on the admin side and if they are showing on the admin side we will also
5:48
see those Options under this schedulers button here so for example I have some
5:54
tennis courts and some pickle ball courts but rather than seeing them all under one one scheduler I would like to
6:01
have that View broken down so that the tennis courts and the pickle ball courts
6:06
are a little bit easier to manage on my end and when creating custom schedulers
6:12
you’ll be able to filter these specific courts or Court types that will show on
6:17
it so from a scheduler you know we are going to be able to book reservations
6:24
manage reservations manage lessons and events from here so once we are on a
6:30
scheduler if we are looking to book a reservation on a specific court at a
6:35
specific time we will just need to click a spot that has availability and when we
6:41
click on that Reserve button here that is when we are going to see
6:46
the screen where we can book a reservation so from here we can choose
6:52
the booking type so if we are booking a reservation or a lesson we will be able to decide that here we will also be able
7:00
to choose the reservation type that we will be selecting we can choose the start time
7:07
and the end time and we can also set up a recurrence for this
7:12
reservation recurrences are not something that a member are going to be able to set up from the member portal so
7:19
they cannot create a recurring reservation directly from their account this is going to be something that only
7:26
admins would be able to set up for a member so maybe you have contract time that you
7:33
would like to set up for your members and you want to set up a weekly
7:38
reservation on the same day of the week and the same time for a
7:43
member this is going to be how we can do that we can set up daily
7:49
recurrences we can set up weekly recurrences we can set up monthly
7:54
recurrences and we can also set up a custom recurrence where we are manually
7:59
picking and choosing the days that this recurrence is going to repeat on most commonly for reservations I see
8:07
a weekly recurrence set up so I’ll just use that as an example here when we are
8:12
setting up a recurrence the first thing that we will be deciding is having this
8:17
recur every X weeks so if this is something that is happening every week
8:23
we can have it recur every one week here if it’s happening every other week we can have it recur every two weeks this
8:31
is sort of how we just decide how that recurrence is going to be working on a
8:36
weekly basis from there we can also choose the days of the week that this recurrence
8:42
will repeat on so if this is only going to be happening once a week on Tuesdays
8:48
we can just check off Tuesday here but we can have it set up so that it is recurring on multiple days of the
8:55
week from there we can choose to end the series after x amount of dates so if a
9:01
member is setting up contract time for 10 Dates we can have this recurrence end
9:07
after 10 occurrences or if we’ like to set it up by calendar date and we would like to
9:13
set it up so that it’s happening every one week on Tuesday until the end of October for example we can use this end
9:21
by date field here we also have the option of setting up exception dates so if there is a date
9:29
in this recurrence that we already know is not going to work maybe there’s a holiday or there’s something going on at
9:36
your facility and we just already know beforehand this specific date is not going to work we can go in and add those
9:44
dates as exception dates and they will be skipped from the recurrence that we are setting
9:50
up from there if we are creating a one-time or a recurring reservation we
9:55
will then be able to add the players to this reservation so if we are searching
10:01
a member and say they have never made an account when we are searching that name
10:07
if we don’t have a member under that name we can create a new member from
10:13
here as well but if it is somebody that we already have an account for this is
10:18
going to be where we can select those players if we need to override the cost
10:25
for the reservation this is also going to be one place where we can do that and then from here we can choose things
10:31
like courts instructors and if you have any custom fields that may show on a
10:37
reservation this is going to be where we can do that the last thing I’ll point out when
10:43
booking a reservation is we do have a display message that is on the
10:49
schedulers if you are front desk staff I would definitely check with an admin at
10:54
your facility to see if this note is visible on the member M portal or if it
11:00
is hidden from the member portal some organizations will have this hidden on
11:05
the member portal and will use this field for internal note tracking some
11:11
organizations will have this note visible on the member portal just to give those members some additional
11:17
information but if we’re hiding this from the member portal we can add notes here like maybe I am missing the payment
11:25
profile for this member and I just need to add that I need to get this player’s
11:30
payment profile so this field here will just
11:36
depend on how your organization is using it it may be used a little bit differently just depending on the
11:42
visibility that you have for this setting in your
11:47
organization once we have a reservation booked we will then have it set up on
11:53
the scheduler here and now I’ll kind of just go over managing or edit editing
11:59
reservations in the system so if we have a reservation that
12:05
has not been paid for yet we are going to see this dollar sign icon right here and we will also see a red line to let
12:12
us know that it has not been paid for yet so that’s a quick indicator but once we hover over a
12:19
reservation we’re going to have this info icon right here and if we would
12:25
like to edit this reservation we can click the edit button and we can edit any information we can change the
12:32
players out if we need to if you are using guests at an organization and need to add a guest this is all going to be
12:39
where we can do that the next icon here is going to be
12:45
the view players page so this is going to be where we can take a look at all the members that have been added to this
12:52
booking here and from here we can see information like the status of their
12:57
payment we can charge the member here so if the member is entering the facility
13:03
and we want to charge them now we can do it directly from the scheduler and we can also update the
13:09
check-in status for this member so if your organization is using check-in
13:15
statuses and whenever a member enters the facility for a reservation we want
13:20
to mark them as checked in um we can use this here it looks like I don’t have any statuses set up there but typically
13:28
there’s going to be the check check in status for when a member has entered the
13:35
facility from there we also have the ability to email the players from this reservation so if there is any last
13:43
minute information you need to quickly send out to those members this is a way that we can just quickly write an email
13:49
just to the players in this reservation and then from here we can also view the transactions for this
13:57
specific reservation as well so if we need to update the amount for a
14:02
reservation this is another place we can do that if we need to charge the member or avoid the fee for a member this is
14:09
also going to be where we can do that and the last button here is going
14:15
to be the audit log for this specific reservation so if we for example see
14:21
that a note was added and we want to see who added that note we can see who did
14:26
that action what time they did action and the actual action that they did when
14:32
they were editing that reservation so if somebody is overriding a cost if they
14:37
are changing the court or the reservation type or the day in time we
14:43
can use the audit log to quickly see who is changing that information in the
14:50
system so with reservations and lessons we will also be able to manage event
14:56
dates from the scheduler so here we can see that I have an open playay Event set
15:03
up and if I hover over the eye icon we can go to this edit screen and we can
15:09
also edit this event on this specific event date so say this event typically
15:16
takes place from noon to 1 but specifically for today we have a last minute change and we actually need to
15:23
bump the start time in the end time 30 minutes this is going to be how we can quickly do that from the scheduler here
15:31
and if we need to change courts if we need to change instructors or anything like that we will be able to easily do
15:38
all of that from the scheduler here one setting that we also have in
15:44
the system that may be helpful is we do have the ability to drag and drop on the
15:49
scheduler so like I was saying if we need to quickly move an event 30 minutes
15:55
forward or backwards for example we can use the Dragon drop and we can move this
16:01
event to a different time very quickly on the scheduler um and it will depend on the intervals that we have set up in
16:08
the system so if I change this to 30 minute intervals on the scheduler on the
16:13
admin side you know I would be able to quickly just drag and drop this in 30
16:19
minute intervals with the drag and drop I know some people really like this feature and
16:24
I know there are some people that really dislike this feature so we do also have a check box on the top of the scheduler
16:31
to enable or disable the setting so if you are somebody that really dislikes Dragon drop there is also a way to just
16:38
very quickly disable that and then from there you would have to go into the edit screen for a specific reservation or
16:45
event in order to change the time for it so with schedulers managing members
16:55
managing check-in statuses and payments you know we can do all of that from the
17:00
scheduler here but let’s say you’re a facility and you have that peak hour you
17:06
know in the morning or in the afternoon and you just have a large amount of members coming in at once and you need a
17:13
page to just very easily manage payments notes on reservations check-in statuses
17:19
and things like that another view that we have rather than using the scheduler
17:24
is the who’s here today page and that’s going to be under Reser ations on the sidebar and then we’ll have this who’s
17:31
here today button right here on this page we are going to have a
17:38
row for each member that is booked for a reservation or a lesson or is registered
17:43
into an event for the date range that we choose and by default the from and the
17:49
to date will be for today so if we need to quickly just
17:54
check members in We quickly need to make sure that members have paid for their reservation today this is going to be a
18:01
page where we can quickly get a list of all the members that would be coming in today and either changing their check-in
18:08
status or charging them from here we can also search for names pretty easily so
18:14
if we are looking for Harrison and just need to really quickly find his name we will be able to just use this search bar
18:22
here and find that member very quickly this is a page that I see used a
18:29
lot at front desks especially for those organizations that have those peak hours
18:34
where there’s just a large influx of members coming into the facility at one time um I know on the scheduler you know
18:42
it can be a little bit more challenging to find the court that they’re on find the reservation that they’re on go to
18:48
the view players page so this is just going to be a very easy and quick way to
18:54
manage all of those members that may be coming in at one time
19:01
all right great so with managing schedulers member availability member
19:07
check-ins and payments and things like that another thing that front desk staff may need to quickly be setting up our
19:14
closures in the system so if you would like to set up closures we do have a
19:20
shortcut that’s on the top of this page right here but I will also show you the
19:25
setup for closure types and things like that so if if we are creating closures
19:30
in the system the first thing that we would want to do is set up closure types and those different reasons that we may
19:37
be closing the courts so if we go to settings on the sidebar and we go to the court and ball
19:45
machine settings on the right of this row we’re going to have closure types and from here again we can create
19:53
a closure type for any reason that we may need to close the courts at our fa
19:58
facility so maintenance holidays weather anything like that we can choose that
20:05
closure type name here and then we can also choose things like background color
20:10
and text color so that maybe these closure types can be a little bit more easily identifiable on the scheduler for
20:18
your members but once we have the closure types set up then we can actually go in
20:24
and create a closure so we can go back to settings on the sidebar we can go to
20:29
the coure and bom machine settings and then next to closure types we are going to have the closures
20:38
page from here we would be able to take a look at any closures that are already made in the system we can also manage
20:46
past closures from past dates if we need to and then we can click the create
20:51
closure button to get a closure set up so from here we would first be choosing that closure type
20:59
and then we would be choosing the start date end date and start time and end time so if we need to close the courts
21:08
for weather very last minute it may be from 1 to 3 today we can easily do that
21:14
by picking the same start date and end date and then choosing the start time and end time but maybe you have to set
21:22
up weekly closures for maintenance on your courts so let me change it over to the
21:28
maintenance closure type if we need to set this up on a recurring basis we also
21:34
have a recurrence field here as well so what we would need to do is make sure
21:40
the start date and the end date are the same date here and that will show this
21:45
recurrence field and then from there we can set up you know for example a weekly
21:50
recurrence and we can say that every week on Tuesdays from 1: to 3 we are
21:57
going to be setting up this closure until maybe the end of the year
22:02
for example again we have the exception dates field if we need to skip any dates
22:08
during this recurrence but from here we can also display a message for the
22:15
scheduler that shows to the members and then we can then select the courts that are going to be affected by
22:21
this closure so if we are only going to be affecting our tennis courts for
22:27
maintenance you know we can just check off those specific courts and then from there if we have
22:33
any reservations or events that are going to be affected by this closure we
22:38
will then get a table where we can see the specific reservations or events that
22:43
are going to be affected from here we can cancel or edit the reservation if we need to or we can
22:51
set up a cancellation policy for this closure so from the affected times are
22:58
we going to have no cancellations are we going to cancel all reservations or
23:03
events that were affected during this time range or are we going to only
23:09
Cancel reservations or events we’ll be able to pick and choose that when we are setting up this closure
23:17
here once we save that closure into the system it will then be added so if we go
23:23
back over to the scheduler we will then see that I have
23:28
this maintenance set up and again if I chose to cancel all reservations or events these reservations would
23:35
automatically be cancelled when I save that closure all right great so that goes
23:42
over managing members checkin statuses and payments for bookings from
23:48
schedulers and a few other places like the who’s here today page another place
23:55
that may be valuable to know is like we have we have audit logs on specific
24:01
reservations or events we do have an overall audit log in the system so if we
24:07
go to audits on the sidebar and we go to the audit log page this is going to be where we can take a
24:14
look at really all actions that are happening in the system so if we would like to filter the actions that were
24:21
done by a specific system user we can filter by that system user here we can
24:27
choose our action type which would be things like cancel delete or edit and
24:32
then we can choose our entity type so that would be things like reservations
24:37
events or closures and then we can choose our actions start and end range so when they
24:44
made this change or we can filter by when the booking or the event actually
24:50
takes place in the system so top Fields here are when I’m making the edit these
24:56
bottom Fields here are for when that booking actually takes place but from there we can run this
25:03
report and we can quickly take a look at all of those actions that are happening in the system um so again we’ll be able
25:10
to see things like time changes Court changes overriding of prices um and
25:16
anything like that for closures reservations lessons and events in the
25:25
system all right so the next thing that may be valuable here for front desk
25:31
staff is the front desk waiver URL um if you are an organization that is using
25:37
the advanced liability forms add-on and you are requiring that members fill out
25:43
a general liability waiver or anything like that we do have a URL that is
25:49
specific for the front desk to use so that they can quickly get those members to sign a waiver so if you have a tablet
25:57
at your front desk you can set up the front desk URL on that tablet and that
26:02
way they can just quickly give the member that tablet and they can sign that waiver when they are when that
26:08
member is entering the facility so to get to that front desk waiver URL we can
26:14
go to settings on the sidebar we can go to the reservation
26:20
settings row and we can go to the waivers and agreements
26:25
page if we go on the additional set tab there is going to be the option to allow
26:31
signing at front desk if we enable that that’s going to give us the URL to start
26:38
your front desk waiver and signing and we also have the option now to allow
26:44
guest waiver signing at the front desk and this is a part of a new feature that we have for guest waiver kiosks so you
26:52
can now set up a kiosk for people that do not have an account at your organization to quickly fill out a guest
27:00
form like their first name last name email address or any custom fields and
27:05
we can also have them sign any specific waivers that we would like to push to those guests but we can also add the
27:13
guest waiver to the front desk URL so once we allow guest waiver signing at
27:20
the front desk we can then choose which guest waiver kiosk we are going to be
27:25
displaying on this URL and the system is going to be looking at the guest form
27:31
that is set up on this specific kiosk and show that guest form on this URL
27:37
here so once we are allowing signing at the front desk and if you are using the
27:43
guest waiver kiosk feature once we are allowing guest waiver signing at the front
27:48
desk once we save this and we go to that front desk URL if there are any members
27:55
that are in your signing queue you’re going to see their name show up here and you can quickly click that member and
28:03
have them fill out any waiver that they need to and if there are any guests that
28:08
show up to the front desk and you want to quickly show them a guest form and guest waiver designed we can also click
28:15
the guest waiver button this is going to take them to the guest form that you have set up on your
28:21
kiosk and then for any guest waivers that you are presenting to guests they
28:27
will see that here they will be able to add their signature and save their guest waiver into the
28:38
system all right great um so that goes over everything that I wanted to go over
28:44
today um I know it was mostly on managing members and
28:50
registrant reservations and events on the scheduler and also the who’s here today page um does anybody have any
28:58
questions or Weis is there anything that you feel like you would like for me to
29:03
go over or just clarify brother that was great um right
29:09
now there’s one question actually in chat so we can go over that um if you
29:15
could go back to the who’s here today page this is my like favorite page in the entire system this is so helpful um
29:23
for your front desk there’s other pages that they need to know how to learn to
29:28
read and how to use but this is going to be the easiest place for them to get
29:33
like the information they want for the day like it shows everyone who’s coming in the order that they’re coming in
29:39
where they need to be whether or not they’ve paid it’s all the information they could need right in one place this
29:45
page is super handy so if you guys aren’t already using this at your facility I highly recommend trying it
29:50
out because it’s super good um question in chat Josh will guest
29:57
waivers be safe for the future or is it just for onetime use yeah so we do store guest waivers in
30:05
the system so if you go to things like the waivers report or if you look at a
30:11
specific waiver in the system um let me show you so over in settings if you go to the waivers and
30:18
agreements page and you know we take a look at a specific waiver
30:25
here we will be able to see each version of that waiver how many members have
30:30
signed it and if it has been signed you know we do save those guest waivers in the system with that being said it does
30:38
not save the sort of waiver tracking so if I do not have an account and I go to
30:45
the guest waiver kiosk or I sign a guest waiver at the front desk using the front
30:50
desk URL the system does not have a way to keep track of the fact that you know
30:56
someone under my name has signed this guest waiver so that guest will have to
31:02
sign a guest waiver each time they enter the facility um you know if if it’s
31:07
something like a general liability waiver that you have where the member only signs it at one time the system
31:13
does not have a way of keeping track of a guest and if they have have or have
31:20
not signed that waiver um you know in the
31:26
past sweet very good um next could you show us where the
31:35
um check mark is whether for whether or not the notes that you put in on a reservation are
31:41
visible for uh members or not right yeah so to choose if this note here is going
31:48
to display on the member portal this is going to be under settings on the sidebar if we scroll down to the portal
31:56
settings row and we go to the setup page there is going to be a setting here
32:05
let me find it to show reservation event notes on all schedulers so this setting
32:12
under the portal setting setup page if it’s unchecked will hide this note from
32:18
the member portal um with that being said there is also a setting to show
32:23
this note on the scheduler on the admin side so if we want to hide it from
32:29
Members we want to uncheck this setting if you want to double check and make sure these notes are visible on
32:35
schedulers on the admin side we can go back to settings on the sidebar if we go to organization
32:42
settings in the general page we are going to have the show event
32:50
reservation notes on schedulers for the admin side so we have a setting to toggle this both on the admin side and
32:57
the member side and they are separate just to just to point that out sweet and isn’t there also one when
33:05
you’re editing the reservation like at the very bottom of the reservation edit screen
33:12
there’s the one that says hide on public scheduler I think is that even for here I don’t
33:19
remember what that one’s for to be honest let’s see
33:27
I believe that for the entire reservation yeah I believe that is for the entire reservation yeah okay cool I
33:35
didn’t know if that’s when she asked that’s immediately what I thought of but I I wasn’t entirely sure sweet well
33:41
thank you um next is there a Best practice list of permissions for a front desk person of whether or not they
33:48
should have um right now I don’t think we have something like that that’s a really good idea of something we should work on yeah i’ be happy that yeah yeah
33:56
we don’t have a best practi IES right now because it can just differ so much depending on your facility’s needs you
34:04
know maybe there are even some sub admins that may have permissions that others do not um but I’ll be happy to
34:10
touch on some of those sub admin permissions right now so when we go to the settings page and we go to the
34:18
system users page under the sub admin edit screen
34:23
when we scroll down to the permissions let me just un check all of them here and go over a few key ones you
34:32
know that you may want to consider enabling just depending on the permissions you want to give them so we
34:38
have the ability to create reservations in the system as well as create
34:44
reservations in the past so most likely for front Des staff we will want to be
34:49
enabling that setting there um you know if we want to give them or restrict them
34:55
from creating closures in the syst system we can choose to allow them to
35:00
close courts and also manage closur so if you want them to be able to create a
35:06
closure we can enable the ability to close courts if you want them to be able
35:11
to edit closures that are already created in the system we can enable the ability to manage
35:17
closures and then from there these settings here I think are the most key
35:22
depending on the permissions you want to give to your sub admins so for editing and deleting
35:29
reservations we can choose to allow them to edit or delete any
35:34
reservations if we allow them to do that they can edit or delete any reservation
35:40
that is currently created in the system if we sort of want to restrict that
35:45
maybe we don’t want to give them access to all reservations that are created in the system we can allow them to only
35:53
edit or delete reservations that are owned by them and when it says owned
35:58
only this means that they can only edit or delete reservations that they created
36:04
as a system user in their system user account so that’s a way to give some
36:10
restriction there maybe say you know we don’t want you having access to editing all reservations but if you created this
36:18
reservation from the front desk you know computer and you need to edit it we want to give you access to that um we can use
36:25
the owned only settings here we also have some settings around
36:32
creating editing events um and with editing or deleting events we have the
36:37
owned only set of settings there as well so again um it depends on how much
36:44
permission you want to give those sub admins and I know that can differ facility to facility it may even differ
36:51
sub admin to sub admin um so it’s definitely worth you know taking a look
36:57
at the settings and seeing what would best fit your facility um there’s a lot
37:03
of different settings here so a few other ones that I can point out are the ability to access
37:10
transactions process payments and revert payments or void fees so those are some
37:16
pretty key ones just in the sense of how much permission you want to give those
37:21
sub admins when it comes to your financials or any you know fees or payments in the system
37:29
uh what else may be important here the ability to manage members so if you want
37:34
them to be able to view members update members accounts send emails out to your
37:41
members or manage member groups in your organization um that’s another good
37:46
permission to give to your sub admins um you know allowing price overis on
37:52
reservations or events that one could be one that you would really want to enable or really want to keep disabled again
37:58
just depending on those permissions um so yeah I would say those are probably the most key ones that I would recommend
38:05
taking a look at first um of course you know I would recommend when you find the time to just look through these
38:11
permissions because it really can differ facility to
38:17
facility yeah that’s true that’s kind of the the hardest part about those is it’s kind of it really depends on what you
38:25
guys want to do and what permissions you want to give them so it’s good to go through that list determine what’s best
38:30
for you and again you can if you have different system users accounts for your different front desk staff then you can
38:36
vary based on who is live right um next what is the best practice for the end of
38:44
day report so Josh could you pull up the end of day report please I’ll take this one yes so we go to transactions oh
38:51
sorry go ahead no you’re good under transactions end of day report really once you pull this this up this is what
38:58
a majority of facilities are using it automatically defaults to filtering to just the system user you’re logged in as
39:06
so any transaction processed by that person will show here and it automatically filters to the current
39:12
date and this is what a lot of people are using to cash out um you can vary
39:17
from this I don’t see people doing that very often but um if you’re doing this
39:24
as a full admin and want to use this for like some quick reporting or reconciling
39:29
I would recommend taking the system user out because it will filter just to you for you as well but for your sub admins
39:36
I believe they’ll only be able to see their own they won’t have the option to filter for other system users so you
39:43
don’t have to worry about them poking through all your financial information they can just see the total of what they
39:48
processed and quickly export it to you guys can have that information but again most people are just using this report
39:56
as it comes right when open it up anything else to add Mr Willie no no
40:02
that is everything that I would said um next if we have bookings and we have a
40:09
closure due to weather how do we cancel the booking without losing the information
40:16
so if you do cancel a reservation in the system we do also have a cancellation
40:22
report that will give you a lot of that information from that booking so if we go to reports on the
40:28
sidebar we’re going to have that cancellations option and from here we can choose to
40:35
include reservations events you know we can choose just one or the other or both
40:40
here but from this report we will be able to see when it was canceled who it
40:46
was canceled by the cancel reason but you will also be able to see start dates
40:52
end dates start times and end times for the reservation the courts that reservation was on the players or the
40:59
registrants that were included in that reservation um and really you know if you have any reservation custom Fields
41:06
will be able to grab that information as well from this report so if you are looking to get that information on
41:13
specifically cancelled reservations I think this would be the best report for
41:19
that yeah right and when you are creating the closure there’s also the
41:24
option to cancel right in that step so you don’t have to go through manually cancel every single one of them when
41:30
you’re creating that closure it gives you the option at the very bottom to how you want to handle those uh closures
41:38
those cancellations things like that um and that’s just what is reserved or what
41:43
events are going on in that time frame I don’t know I guess you’ll have something to see yeah there you go so you can select the cancellation policy and which
41:52
of those you want to cancel right um next
41:58
is the only way to use the kiosk to sign waivers is to First add the additional
42:03
liability forms and membership agreement add-on yes correct yeah you have to have
42:10
the waiver add-on to use and collect signed waivers in the
42:15
system next is there a way to send texts regarding specific classes or events to
42:20
people register for those right now I think the only option is emailing um you
42:28
can like manually select those members it’s a little bit of work um one trick I
42:33
like is specifically for events on the members report you can
42:39
look up specific events and that’ll pull up the list and you can text straight out of that report not the simplest
42:46
response ever but it is possible um unfortunately right now we only have emailing but that’s a good that’s
42:51
something we should write down to add I think yeah definitely yeah yeah
42:58
all right great any other questions right now that looks like it I guess we’ll give it another minute or so
43:06
but Josh great job that was very good and informative I knew you would not disappoint so that’s good thank you very
43:15
much all right well if anybody has any additional questions that come up later
43:21
always feel free to reach out to our customer success team and they will always be happy to help we will also get
43:27
a recording of This uploaded to our YouTube um sometime this week most
43:33
likely sometime this afternoon but if not it will definitely be in the next few days oh looks like we may have yeah
43:40
we do have a few a lot of them are just telling you you did a great job um the the recording will be up on YouTube
43:47
later today or probably tomorrow um I don’t think we send out an email for that but it will be up um on the YouTube
43:55
channel and yeah um also to point out something really quick we do post the U the um URLs for
44:03
these webinars recordings in our Facebook group so if you click the Facebook icon in the top right corner
44:10
and you join that uh Court Reserve Facebook group that we have we always will upload any recordings to webinars
44:17
over on that page
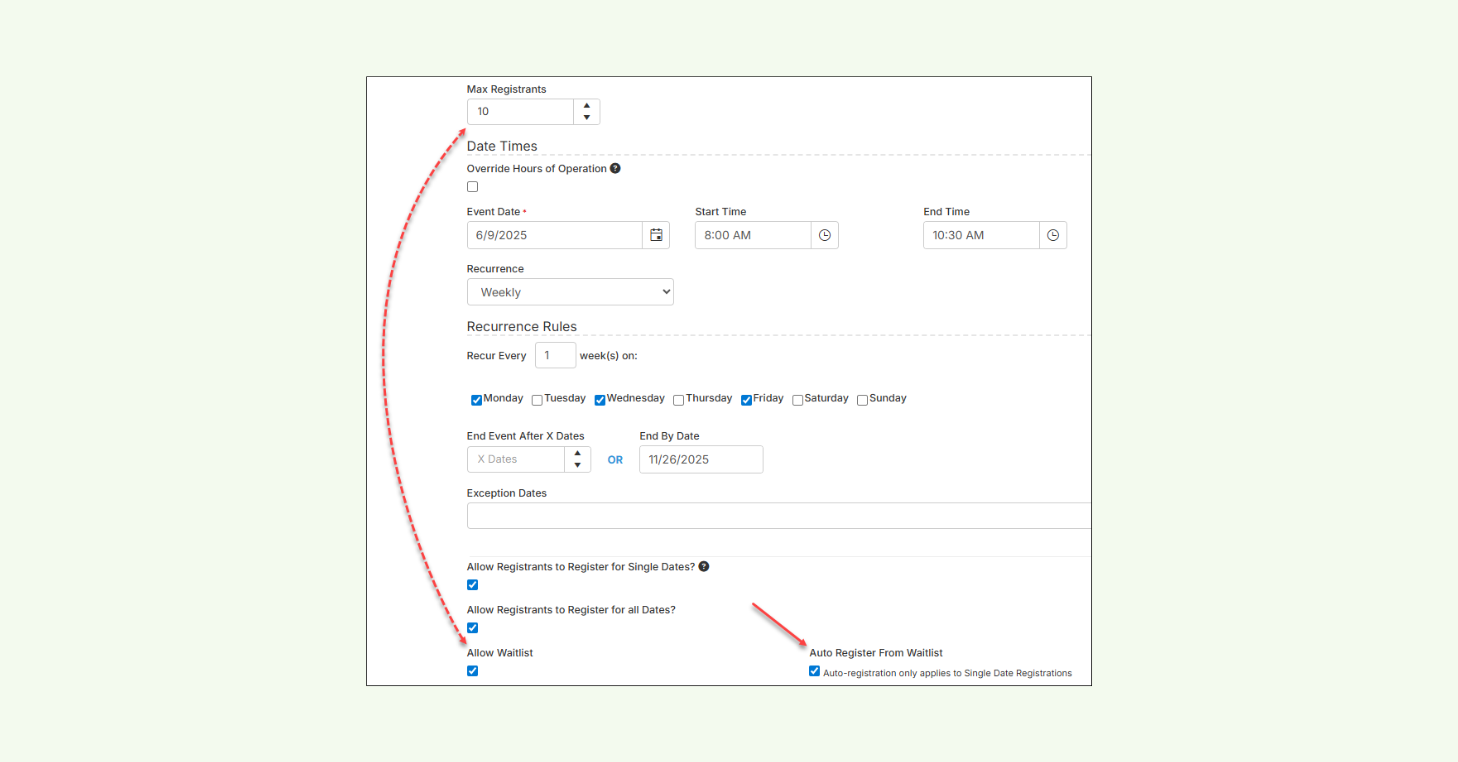
2. Waitlists that keep demand moving
When courts are full, events sell out, or membership caps are reached, front desk teams often end up managing availability and filling spots by hand.
Instead of managing demand manually, clubs can enable waitlists for courts, events, and memberships and let the system do the heavy lifting.
Across each category, the workflow is simple: players or prospects join a waitlist when capacity is reached. When a spot opens, the system notifies the next eligible person and gives them a clear path to book or accept the offer. Staff can still view, manage, or step in when needed — but no longer have to babysit availability.
In addition, for single-date event registration, clubs can automatically fill open spots from the waitlist. Using a first-in, first-out approach, CourtReserve registers the next player as soon as a spot opens and sends a notification — no manual follow-up or confirmation required.
The result is fewer follow-ups, faster backfilling, and better utilization of courts, events, and memberships without adding front desk work.
Event Waitlist setup screen in CourtReserve showing waitlist settings and automatic registration from the waitlist.
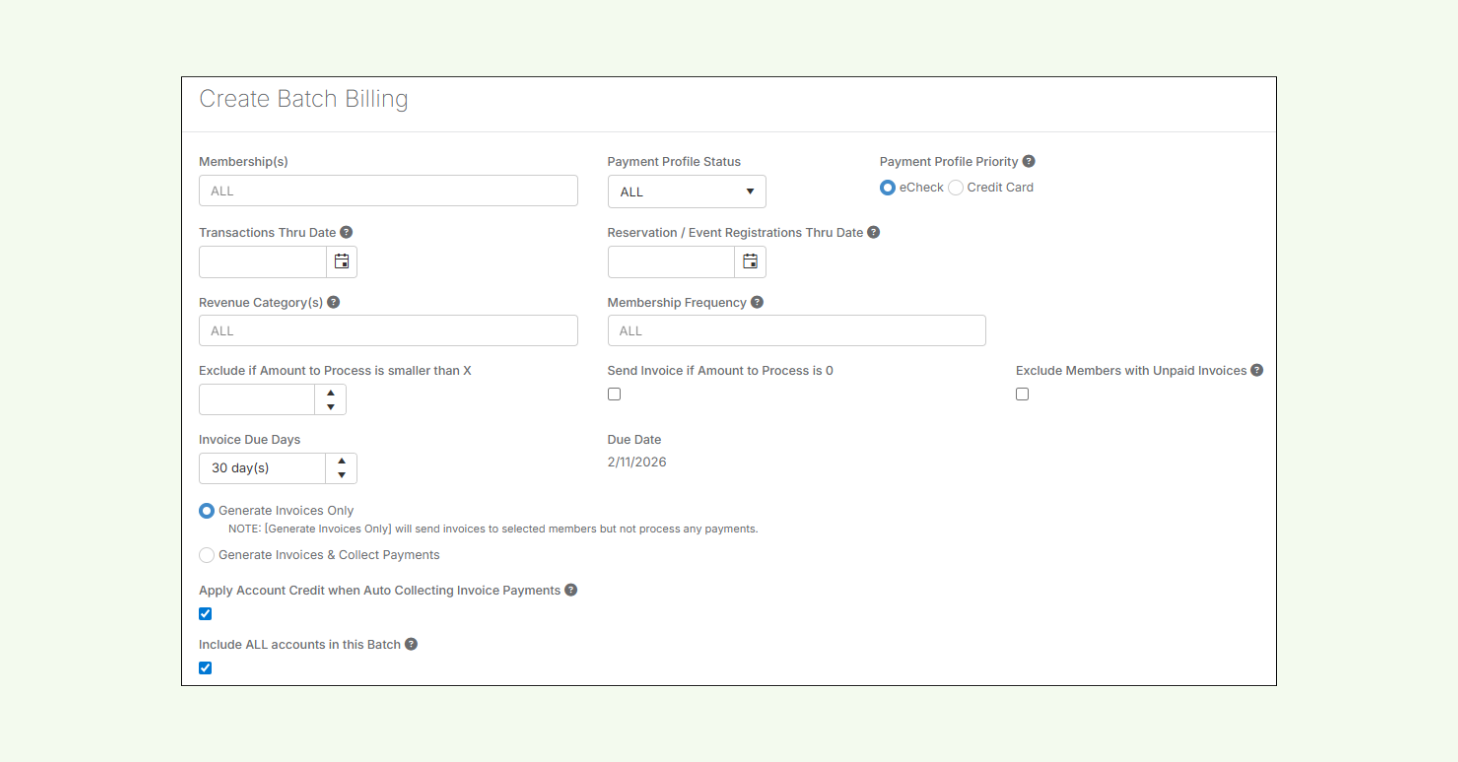
3. Fee collection that runs in the background
Collecting fees is another area where small manual tasks quietly pile up. Posting charges, tracking unpaid balances, and following up with members takes time — especially when done one account at a time.
Automated fee collection helps clubs keep accounts current with minimal front desk involvement, using a few key workflows:
Batch Billing Clubs can collect monthly membership dues, court usage, lessons, events, and other fees in a single billing run — rather than processing charges individually. This reduces the number of credit card transactions, helping lower processing fees while saving staff time and simplifying billing for members.
Auto-Pay Membership Fees Membership dues are automatically charged to a member’s saved payment method before the next billing cycle begins, helping prevent lapses in active memberships.
Auto Apply Account Credit to Unpaid Fees Available account credits can be applied automatically to unpaid fees, reducing outstanding balances without manual intervention.
Together, these front desk automations make fee collection more predictable, reduce missed charges, and keep player accounts accurate at your racquet club.
Batch Billing setup screen in CourtReserve showing options to generate invoices and collect payments for memberships, reservations, and events.
4. Auto-Refunds that handle routine cancellations
Processing cancellations, issuing money back to players, and double-checking that nothing slips through the cracks quickly turns into a steady source of manual work for front desk teams.
Auto-Refunds allow clubs to automate routine refund scenarios by setting clear policies in advance. When a paid reservation, lesson, event, or drop-in is canceled, the system checks those rules and processes the refund automatically. Anything that falls outside your club’s policy is flagged for manual review — so your club stays in control when it matters.
This keeps refunds moving without requiring constant front desk involvement and ensures policies are applied consistently.
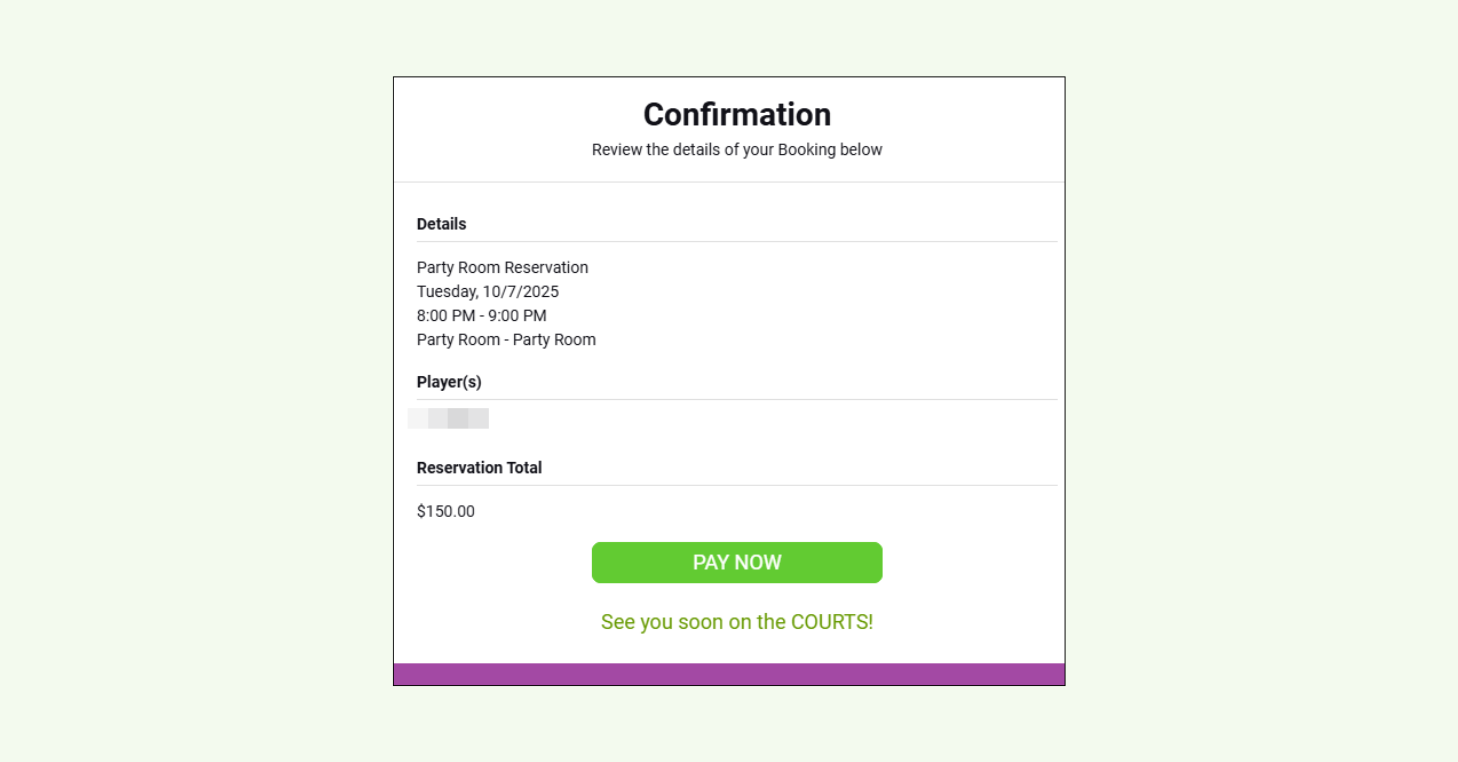
5. Player Notifications that reduce front desk follow-ups
Front desk teams spend a lot of time answering the same questions — often because players didn’t receive an update when they needed it.
Automated player notifications help answer those questions before they’re asked. Instead of relying on manual communication, your racquet club can automatically send confirmations, reminders, updates, and notices based on real player activity.
These notifications are triggered by actions across reservations, lessons, events, memberships, leagues, and payments — keeping players informed without requiring front desk follow-ups.
The result is clearer communication, fewer inbound questions, and a front desk that can stay focused on higher-priority tasks instead of inbox management.
Example of CourtReserve’s automated confirmation notification showing reservation details and a payment prompt.
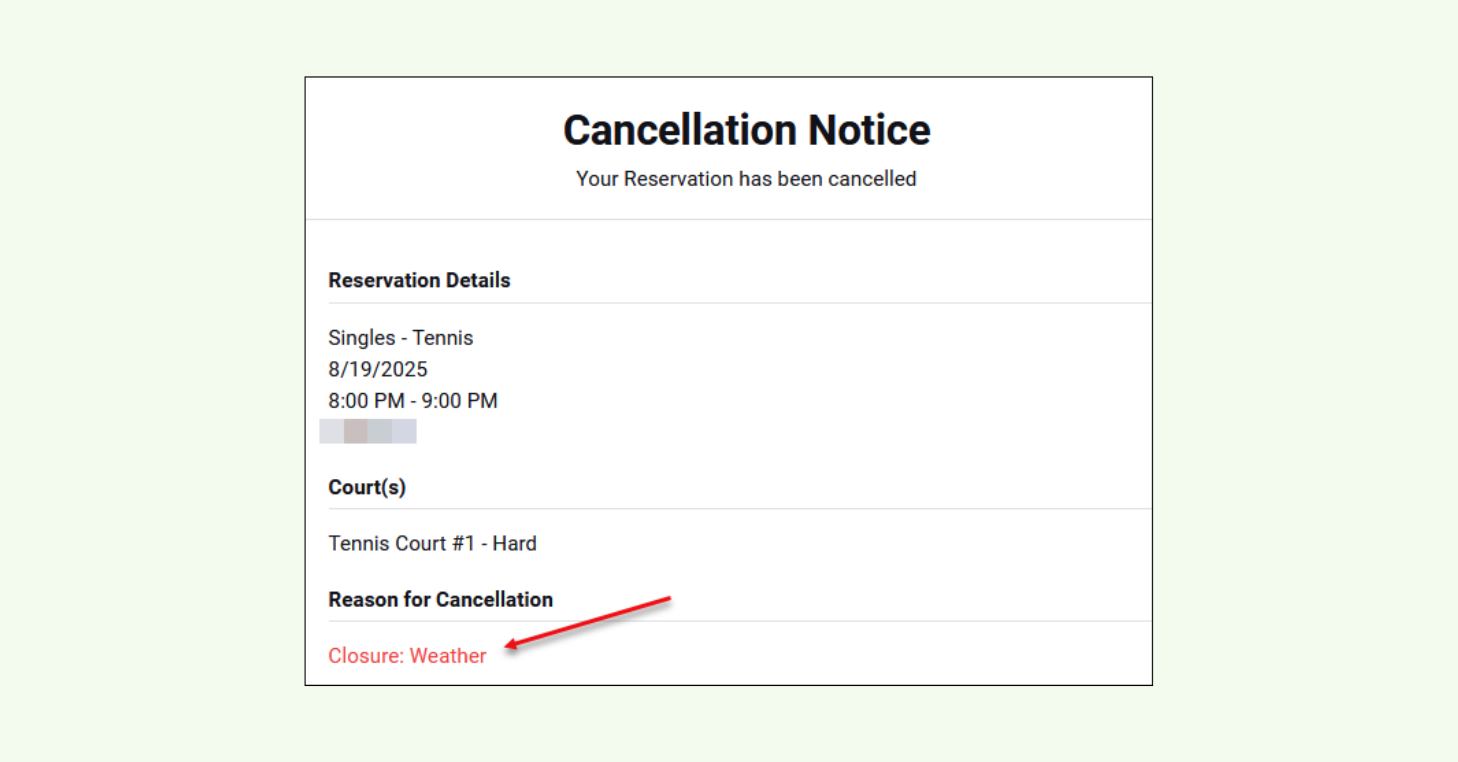
6. Cancellations & closures that enforce your policies
Cancellation policies help solve part of this problem by giving racquet sports clubs clear control over when players are allowed to cancel. Time-based cutoffs are defined in advance, automatically blocking cancellations within a set window. This keeps policies consistent and removes the need for staff to intervene.
When courts need to be closed due to weather, maintenance, or other circumstances, closure automations handle the rest. Affected reservations or events can be canceled automatically based on the selected cancellation policy — without staff needing to update each booking individually.
Together, these automations apply rules consistently and reduce the manual cleanup that usually follows schedule changes.
Example of CourtReserve’s automated cancellation notice showing a court booking canceled due to a weather-related closure.
7. Digital Waivers that eliminate paperwork
Paper forms get lost, signatures get missed, and staff end up chasing down players for waiver signatures.
With Digital Waivers, you can replace those manual processes completely. Clubs can require electronic signatures for waivers and agreements tied to specific actions — like upon login or when registering for activities or booking courts — and prompt players to sign before they proceed.
Signing Rules ensure the right forms are presented at the right time, with completed waivers securely stored and linked to each player’s account.
Because waivers are managed digitally and triggered automatically, staff don’t have to collect, file, or track down signatures. The result is cleaner compliance, fewer front desk interruptions, and a smoother experience for both players and staff.
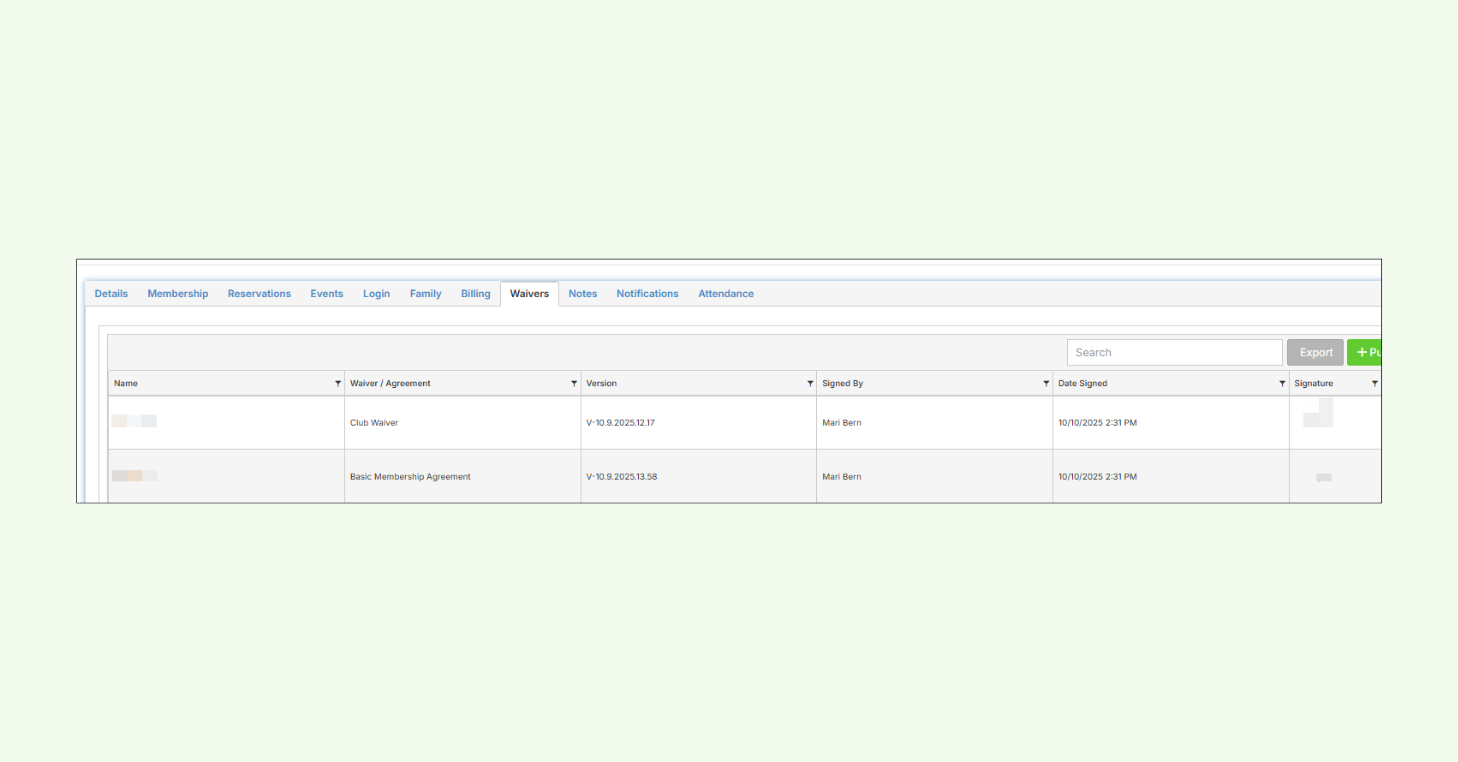
Example of CourtReserve’s Waivers tab within a member profile. System users can view which waiver or agreement was signed and the date it was completed.
Conclusion
Front desk automation comes down to being intentional about where human effort is actually needed.
When routine work runs automatically, front desk teams have more space to do what matters most. Less time is spent tracking details and enforcing rules, and more time goes into supporting programs, players, and day-to-day operations.
That shift creates consistency behind the scenes and a noticeably smoother experience at the front desk. Staff have room to breathe, and the player experience benefits as a result.
Elevate & Engage: Kick-starting Success in Your New Pickleball Club
This comprehensive ebook is tailored specifically for club owners and facility managers. With actionable insights, practical advice, and industry secrets, you'll have everything you need to elevate your Pickleball club to new heights.
Simply give us your email below and we will send over the free guide instantly to your inbox!
Elevate & Engage
Unearth the secrets of creating an appealing and fully-equipped pickleball facility. Learn how to build a vibrant player base and develop enticing membership levels.