Year-End CourtReserve Checklist: Set Up Your Racquet Sports Club for the New Year
December 11, 2025
This is your chance to wrap up the year cleanly, make a few key updates, and ensure CourtReserve is ready to carry your racquet sports club operations smoothly into January.
A few simple updates inside CourtReserve now can prevent renewal confusion, pricing hiccups, reporting headaches, and last-minute scrambles when your courts and programs ramp back up.
In this guide, we’ll take you through what clubs should review and refresh as they close out the year and gear up for the new season. Let’s get started.
For a step-by-step walkthrough on setting your club up for the new year, check out our recent webinar:
Video Transcript
0:02
Hello everybody. Happy Wednesday and thank you for joining us for today’s uh
0:08
spark webinar uh at Court Reserve. I’m Kim with the product team. I am joined today by my partners uh Josh Willie,
0:16
Matt Chrisell. I’ve got uh two two awesome product owners also on QA, Josh
0:22
and Aaron. Thank you guys all for being here today. Um, and so today we’re gonna we’re going to talk to you guys about
0:28
getting ready for 2026. Um, these are going to be tips and tricks about, you know, maybe how to close out 2025, get
0:35
your system ready for 2026, housekeeping things, stuff like that. Um, just to
0:40
kind of help you all get get set up and ready for the new year. Um, so really excited to give you all this information
0:46
today. We’ve we’ve met with a lot of our CS people and uh those folks just to
0:51
make sure we’re getting you guys, you know, answering a lot of the common questions that come into CS. So, we’re excited to get started today.
1:00
All right, just a couple of things before we jump in. Um we wanted to remind everybody that there is another
1:06
Club Pickle Ball mastermind coming up in a couple of weeks in December. Um, if you haven’t been to Club Pickleball
1:12
USA’s mastermind, um, Devin and his team have done an amazing job and really
1:18
honing in on the things that you should know in the pickle ball space. Um, you know, and then you get a monthly monthly
1:24
call after that where you can kind of meet and talk to other industry professionals within the pickle ball space and uh, you know, facility things
1:31
and stuff like that. So, definitely give Devon uh, a look if you’re interested in joining. I believe uh, Josh is going to
1:37
throw that link in the chat as well. So, you have that link, but it’s clubpickablemastermind.com/book-call.
1:44
So, definitely give Devon Devon a ring if you’re interested in joining.
1:49
And then don’t forget, Court Reserve is going to be out and about this fall in December, um, November, December. So,
1:55
we’ve got a bunch of events that we are scheduled to be at. We would love to see you. So, if you see that Court Reserve booth, please come and give us a hey.
2:01
Uh, we love to take pictures, post them on social media, and just meet you and and hear about your club and how you’re
2:07
doing. All right. And then lastly, before we get started and jump right in, we’ve got
2:13
a one more webinar on the schedule for 2025. Uh we’re going to do it on December 4th at 12:00 Eastern about
2:20
building newsletters and emails. And so we’re going to actually have uh Michelle
2:26
who is on our team and she’s actually the marketing person for Old Coast Pickle Ball, Tim and Ashley’s facility in St. Augustine. And so she’s going to
2:32
take us through a lot of the uh tips and tricks for building successful email campaigns in court reserve. And Josh, I
2:38
believe you’re also going to join that call as well and kind of go through some of the new bells and whistles of the email suite that we have in beta, right?
2:44
Yes, I will. Very excited. Yeah, that’s going to be a great webinar. The the whole new email suite is just amazing. And every time we look
2:51
at it, we get so excited. So, that’ll be a really great webinar. If you are interested in joining that, please go to courtresve.com/webinars
2:58
and you can register via the link that we have there. All right. Awesome.
3:03
Well, without further ado, Josh, you’re going to get us kicked off. And just some reminders for everyone as we’re going through these, if you have
3:09
questions, please post them in the Q&A section. If you go to your Zoom toolbar,
3:15
there is a Q&A button. Uh we really would like you to post those in the Q&A.
3:20
Um we don’t have a way of getting the chat questions after and we like to go through and make sure everybody’s
3:26
questions were answered. Um, so if you could just make sure that you’re putting those questions in the Q&A, uh, our our,
3:32
uh, moderating team in the back will mark them for answering live, and we might just answer some of those questions, uh, via typing to them to you
3:39
as well. All right. All right. I’m going to let you get started, Josh, and uh, let’s get going.
3:44
All right, let’s get started. So, the first section that I am going to be going over today is going to be
3:51
memberships. whether we are updating our membership pricing or maybe we are transitioning out of 2025 memberships
3:58
and trying to allow players to pre purchase into a 2026 membership. I’m
4:04
going to try to go over some different scenarios with some different membership structures. Um, and specifically in
4:12
those structures, I mean different frequency options that you may be offering for your memberships. So, first
4:18
I’m kind of going to go over one of the more simple scenarios. Let’s say we have a recurring membership. So, a membership
4:25
under a monthly, quarterly, custom, or yearly frequency, and it kind of just
4:31
continues to roll into each year. It doesn’t have a hard start date or end date to it. But maybe we just want to
4:38
update our membership pricing as this new year is approaching. I’m going to take a look at this recurring yearly
4:44
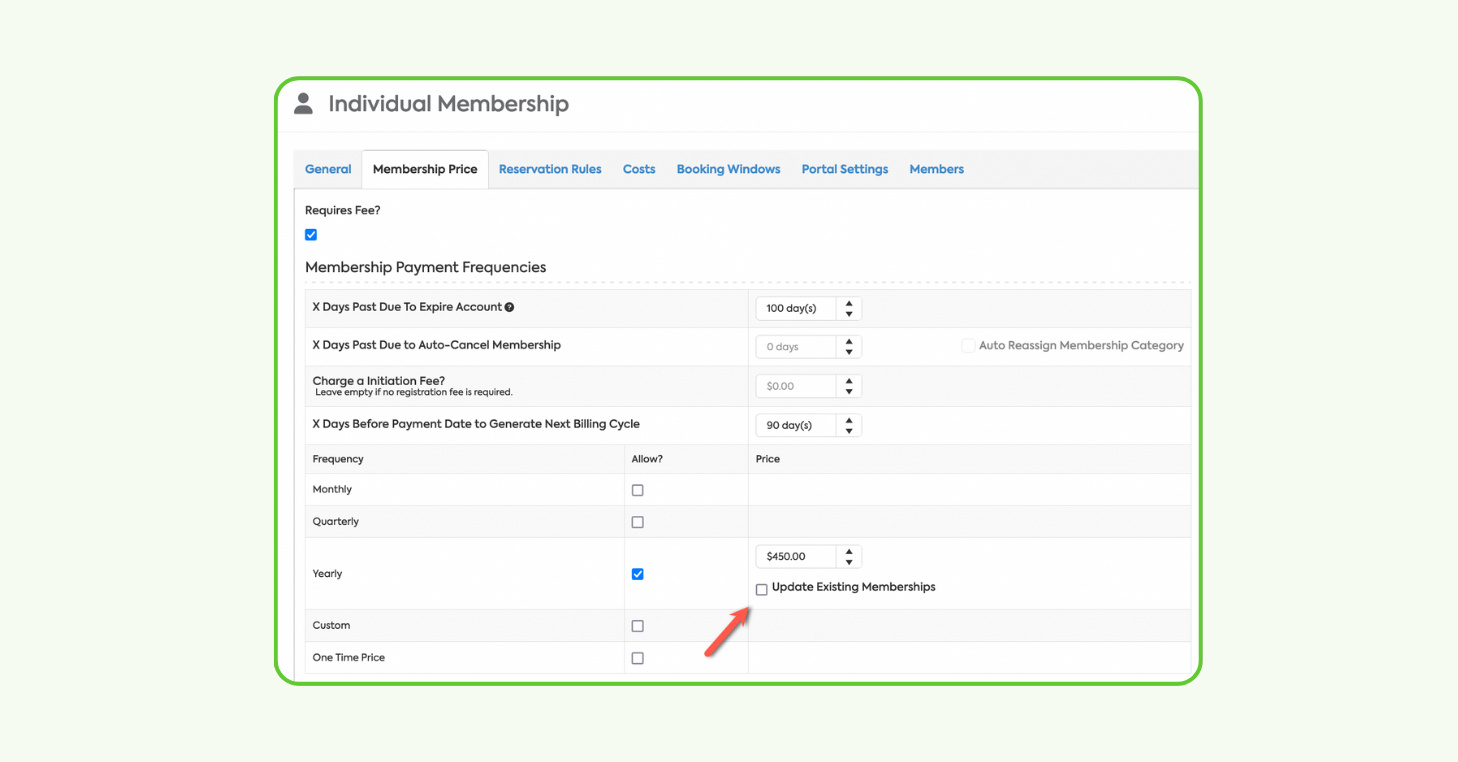
membership that I have. And I’m going to focus in on the membership price tab. So, this is going to be where we can
4:51
update our pricing for a current membership that we currently have in the system. And the main setting that we
4:57
want to take a look at here is going to be the update existing memberships checkbox. We really have two paths that
5:04
we can go here when we are updating our membership pricing for the next year. We
5:09
can either update the pricing for all current players and all players moving forward or we can allow players that
5:17
have purchased this membership under old pricing to continue to have that old price. And we can only have this change
5:24
to the price update for existing or for uh new players that purchase this membership moving forward. So, if we go
5:32
into a membership and let’s say we’re going to be changing the price to $160 a
5:38
year rather than $120. If we check this check box here, this is
5:43
also going to change the price to $160 for all current players that have
5:48
already purchased this membership. But if we want to allow current players to keep their current price and only have
5:54
this update affect new players purchasing this membership, we can uncheck the update existing memberships
6:01
checkbox when we are saving this change. An important thing to remember here when
6:06
we are updating our membership pricing, if we do want to update existing
6:11
memberships pricing, we’ll want to make sure we make this change prior to the 2026 billing cycle being posted on the
6:19
players account. This change here is only going to affect future billing
6:24
cycles that are posted. So, if the 2026 billing cycle has already posted by the
6:31
time we make this change, it’s not going to impact a fee that has already been created and posted on the player’s
6:38
account. So, when we are making this change, we also want to consider the X
6:43
days before billing date to generate next billing cycle since this setting here is going to impact how early that
6:51
next billing cycle would post on a player’s account. So, for example, if I
6:56
have this set to 5 days, I don’t want to go in 2 days before January 1st and make this pricing change because at that
7:03
point, we already have all of our players billing cycles getting posted 5 days in advance. So, that means the
7:10
billing cycle for 2026 is already on the players account. So, this pricing change
7:16
would not impact those billing cycles that were already posted. So, we just want to make sure if we are going to be
7:22
making a price change that is going to impact current customers that we are making sure we do this far enough in
7:29
advance that we are doing it before the billing cycle actually gets posted for
7:34
2026. Now, a few additional settings here that I do also want to point out while we’re
7:40
on the membership price tab. We do have this X days past due to expire
7:45
membership. And this is going to be a great way for us to give a little time window where the player can be past due,
7:52
but they can still be under an active status. So that way they have a little bit of time to pay for their membership
7:59
dues, even if they are a little bit past their billing date. Another thing that I want to point out here is the X days
8:06
past due to auto cancel membership. So, maybe we want to give the player this
8:11
7-day window past their next billing date to pay for that membership without it actually moving them into an expired
8:18
status. But maybe if they haven’t paid for their membership in 30 days, we want
8:24
to go ahead and just cancel this membership for the player since they are not utilizing it. Another great next
8:30
step here with the auto cancel membership setting is we also have the ability to auto reassign a new
8:37
membership to this player when they get auto cancelled. So maybe we want to auto cancel them out of this paid membership,
8:45
but we don’t want to leave them hanging and just have no membership on their account, but we want to reassign them
8:50
maybe to our guest or our non-member or any free membership option that we have in our organization.
8:57
That way, even if the player loses their paid membership, they’re still under this, you know, free more limited option
9:04
and they still have a little bit of access into your organization. Um, that way if they go back in a few months into
9:12
2026, they still have a free membership here that’s giving them a little bit of
9:17
access to booking a court or booking for or registering for an event, for example.
9:23
So, those are the main things that I wanted to touch on for this recurring membership that doesn’t really have a
9:29
strict start date or end date. Um, the next scenario I’m kind of going to go over here is if we want to maybe set up
9:37
a membership that is no longer going to transition into 2026. So, maybe we sort
9:43
of want to deactivate this membership and no longer make it an available option as we’re approaching 2026.
9:50
Before I do that, are there any questions in the Q&A that I’m missing here?
9:55
Yeah. Uh Josh, I’m wondering if you can answer this question. Um but how would
10:00
you update a billing cycle or a billing cycle date if you were going to change those?
10:08
So would this be for if we are trying to update the next billing date? Let’s see
10:15
here. Let’s see. The question uh specifically says this might be next, but how do you
10:20
update billing cycle dates if we’re going to change them? So, um that that’s
10:27
okay. So, there there’s going to be a few ways that we can mass update next billing dates, which I will touch on a
10:33
little bit later. Um we do have a mass update tool where you can go in and you can mass update the next billing date
10:39
for a a membership type. So, we can definitely scar they they just responded
10:44
and said it’s our second year and we want to move the date to January 1st. So, we can hit that a little bit on with the mass updates then.
10:50
Okay, perfect. Yeah, once we get to the mass updates, I’ll make sure we we touch on the the update to uh next billing
10:56
date for sure. All right. And here’s another good question about this page. I think um if a membership is paused due to injury or
11:03
miscellaneous reasons, like it’s suspended or something, would changes be made on this screen?
11:09
So, there really aren’t any settings here that you can set up related to the
11:14
suspension of a membership. Once a player’s membership has been suspended, it’s going to stay in that suspended
11:21
state until an admin goes in and they manually reactivate that membership. So,
11:27
we don’t need to worry about them being auto cancelled or anything like that if they’re in a suspended state. They’ll
11:33
just stay in that suspended state until an admin reactivates them. Perfect. Awesome. All right. Well, that’s all we’ve got for now. If you
11:39
want to keep going. Awesome. All right. Yeah. So, the next scenario I’ll go over is maybe we had this membership in 2025 and we are
11:47
trying to transition out of it as we approach 2026. Maybe we have a new
11:52
membership structure. Maybe we have some new membership types that we’ve already created. Let’s just kind of go over how
11:58
do we transition out of a membership as we approach the new year. So really the
12:04
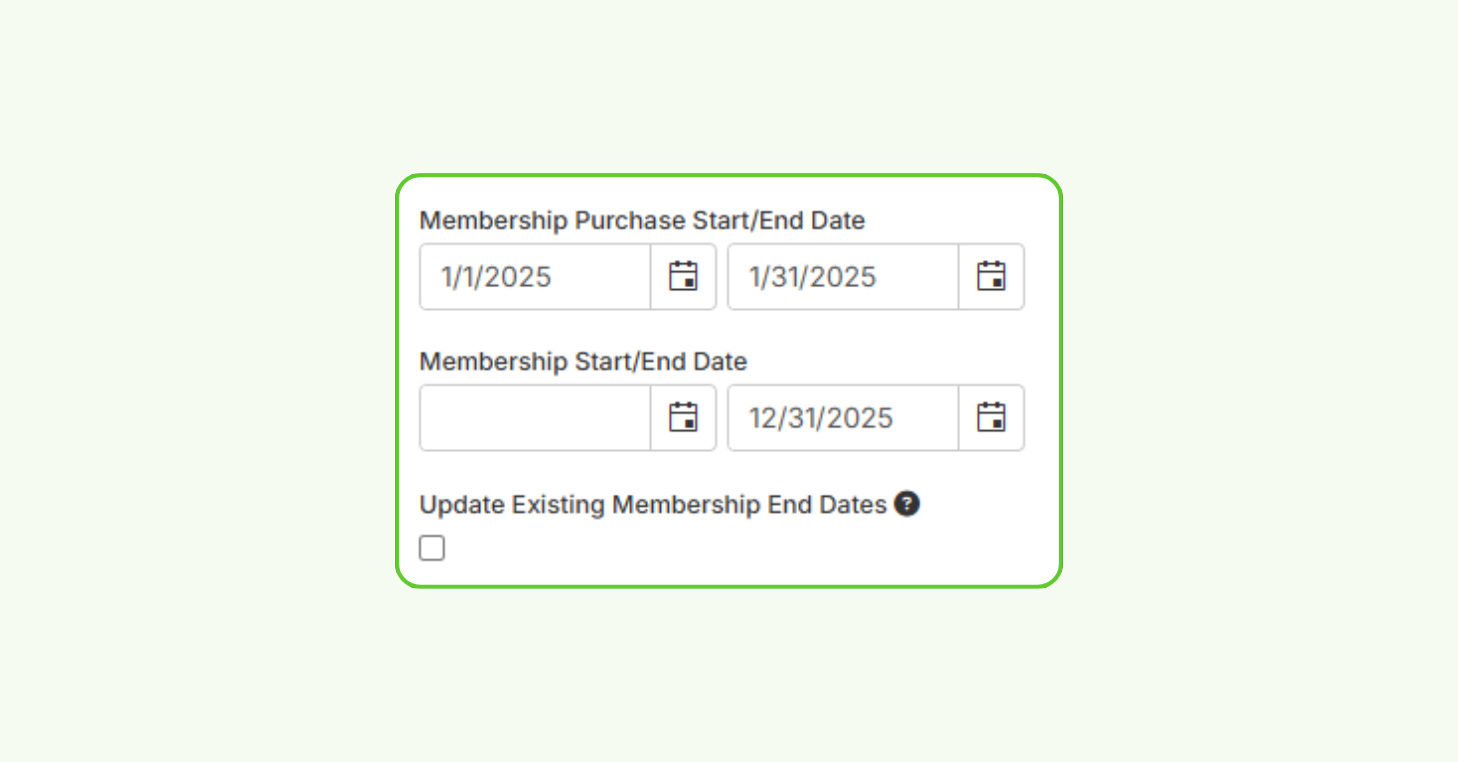
main settings we need to look at are going to be on the general tab here. And the two settings that we really want to
12:11
focus in on are going to be the membership purchase end date and then also the membership end date. I’ll kind
12:18
of go over start dates and end dates and look at all four of these date pickers in more detail in the scenario after
12:24
this. But when we’re talking about just transitioning out of a membership before
12:30
we get to 2026, one, we’ll want to make sure that we’re no longer allowing a player to purchase
12:37
this membership from the member portal. And that’s going to be what the membership purchase start and end date
12:43
pickers will allow us to do. These settings don’t actually impact the active period of the membership. they
12:50
just impact the visibility of this membership on the member portal for a player to purchase it. So, if we are no
12:58
longer offering this membership in 2026, that means we want to eventually no
13:04
longer show this membership as an option on the member portal for a player to purchase. So, as an example here, I’ll
13:12
keep the date simple. Let’s just say December 1st. We’re going to no longer show this membership as an option. So
13:18
that way there aren’t any new players that are purchasing this membership. This is going to be how we can do that.
13:24
Now, if we actually want to update the active period of this membership and we actually want to go in and cancel this
13:31
membership at a membership type level, that’s going to be when we want to take a look at the membership end date. Now,
13:38
something that’s important to think of here when we are setting a membership end date is when we are setting an end
13:45
date here, the membership is going to cancel at the start of the day that we
13:51
are selecting here. So, if we want a player to have an active membership for the entire day of December 31st, we will
13:59
want an end date of January 1st, 2026 here. And that way at the start of
14:04
January 1st, 2026, this membership gets cancelled from the players account.
14:11
Now, an update that we did make here a few months ago that I do want to point out. A few months ago, we added this
14:17
update existing membership end dates checkbox. So, if you ever are updating
14:22
an end date on a membership type, let’s say maybe we didn’t have an end date initially or maybe we put an end date
14:29
and we actually need to adjust it since we’re getting closer to this end date period. Um, from this page, you’re now
14:35
going to be able to update any player that currently has this membership and you can choose when their end date is
14:42
going to be. So, that’s going to save a lot of time there. previously support and our dev team would need to get
14:47
involved there if we were doing you know a mass cancellation date there. So we have given admins the power to be able
14:54
to do that. Of course this does impact a membership’s end date. So you know
14:59
always be careful when we are adjusting this here because if for example we add the current date as the end date that
15:05
would cancel the membership for everybody. So, make sure you’re definitely selecting the right date
15:11
there, especially if it’s kind of close to the current day. Um, especially when we’re using the update existing
15:17
membership end dates checkbox. Awesome. So, that kind of goes over
15:22
transitioning out of a membership that we no longer want to offer. The next
15:28
scenario that I really want to go over here is if we are maybe setting up our memberships so that they are specific to
15:35
the calendar year. And what I mean by that is maybe we are setting up a 2026
15:40
membership and we don’t want there to be any type of recurring billing cycle that
15:46
posts past 2026. So we kind of want a process where the player manually goes
15:52
in and purchases or pre- purchases a 2026 membership and then we kind of want
15:57
them to do that same process once 2027 comes around.
16:02
In any case where we really do not want any billing cycle to recur and
16:08
discontinue to post on a player’s account, we will want to use the onetime
16:13
price frequency. The onetime price frequency is going to make sure that the
16:18
player only gets one billing cycle for this membership, which is great in that
16:23
case. But if we are setting it up this way, then that means we really need to consider our membership purchase and our
16:30
membership start and end dates when we are setting up this membership and making it available for players to
16:37
purchase. So, in the case where we have a one-time price membership,
16:43
if we go to the general tab, now we’re started starting to think about allowing
16:48
players to pre purchase this membership. So, if this is a 2026 membership, maybe
16:54
we want to allow players to begin purchasing this membership on December 1st of 2025.
17:00
That’s where the membership purchase start date is going to come into play. So, if we want to make this membership
17:06
visible as an option to purchase for the player on a specific date, that’s when
17:11
we want to pick the membership purchase start date here. And if we’re sort of following that same structure, I have a
17:18
membership purchase end date here of December 1st, 2026 since that would be the time that we would eventually open
17:25
our 2027 membership. Now, when we go down to the membership
17:31
start and end date here since this is a one-time price membership, there’s not
17:36
going to be any recurring billing cycle that post here. So, for that one billing cycle that the player pays, they’re
17:43
going to have the active period that we select here for this membership type. So, here I have a start date of January
17:50
1st, 2026 and an end date of January 1st, 2027.
17:56
One thing that I do want to point out here is the player does need to have an active membership on their account in
18:03
order to book a court and register into an event. So, if you want to open your
18:09
2026 events prior to January 1st and allow players to start registering into
18:15
them, let’s say December 22nd,
18:21
we really do want to consider that when we are setting up the membership start date here, because again, the player
18:27
does need to be in an active membership in order to successfully register or
18:32
book a court, even if it’s for a date, you know, in 2026. six.
18:38
All right. Are there any questions so far? I see we may have one question here. Is there a membership type that
18:46
allows us to charge a membership yearly bill once a year and the player will be
18:51
charged at a pay as you go basis? Right now, we do not have a way to do that.
18:56
Um, kind of sounds like almost like a payment plan or some way to break up that yearly billing cycles membership
19:03
dues. Right now, we don’t have a way to do that. Um, the player would have to
19:09
fully pay for those membership dues in order for the player to be active in that billing cycle.
19:16
All right. And then another question, if a 13-month package was purchased,
19:22
would you extend the end date for end of 13th month? So, let’s take a look here.
19:30
Um, you could do that. Another option here, if you did want it to be, you know, a recurring membership where, you
19:37
know, another billing cycle would generate 13 months from the start of the membership, you could also use the
19:43
custom frequency because when you are using the custom frequency, you get to choose how many months are in this
19:49
billing cycle that are created for this membership. So, if you wanted it to be a
19:55
recurring membership and you wanted billing cycles to continue posting on the players accounts as their 13-month
20:01
billing cycle um you know finishes up, you could do the custom frequency.
20:07
If you didn’t want any type of billing cycle to recur and you just wanted one billing cycle for the 13-month period
20:15
and then you wanted the player to purchase a new membership after that 13-month period is over, you could do a
20:22
one-time price membership and just set those strict start and end dates. So, it
20:28
would depend on the specifics of that membership, but there would be a few different ways that you could go about that.
20:35
Awesome. All right. So, that goes over the main scenarios that I wanted to
20:41
touch on. So, the last thing I’ll go over are our different mass update tools. Some of them admins are able to
20:48
do themselves. Some of them you do need to reach out to our support team and our support team will need to handle for
20:54
you, but I do want to point them out. So, under members on the sidebar, we
21:00
have a more actions menu here. And on the bottom of that menu, we’re going to have this mass update option.
21:08
So, this is going to be helpful if maybe we are needing to make some changes to players that currently have a membership
21:15
type that we are using. An example that was brought up earlier was the next billing date. We do have a way to mass
21:22
update next billing dates. And when you’re on the mass update page, you are able to use a few different filters
21:29
here. So you can filter by membership types, membership frequencies, you can filter by next billing date when we are
21:36
pulling up the list of players that actually um would get mass updated here. So this is going to be a great tool if
21:43
we need to extend the next billing date for players. One thing that I will call
21:49
out here, um, you cannot change a mass or you can’t change a next billing date
21:55
to a date that has already been paid for in the player’s current membership. So,
22:00
if I have paid for a billing cycle and that billing cycle ends on January 1st, 2026,
22:06
you wouldn’t be able to change my next billing date to a date in December of 2025 because I’ve already paid for that
22:13
for that billing period. So this tool is really here for us to just extend out
22:19
the next billing date if we ever need to do that for any reason. The other option that admins are able to
22:26
do is to update membership price. So this is another way that we can go about
22:32
updating membership price here. Um the one benefit to the mass update page is
22:37
again we have these filters. So, we can filter players that have a membership price that is less than X amount, for
22:45
example, and we can say that, you know, if you’re under our premium membership and you got it when the membership price
22:51
was less than $120, in that case, we’re going to bump you up to 130, for example. Um, so you have a
22:59
little bit more flexibility here on this mass update page when it comes to choosing who you want to actually have
23:05
affected from this mass update. Now, the two actions that you would need
23:11
to reach out to our support team to assist you on are going to be the mass
23:16
cancellation of memberships and also the mass change or assignment of
23:21
memberships. And that’s just because that can make a really big impact for current accounts. Um, so you do have to
23:28
reach out to our support team, let us know what your scenario is just so we can better understand what exactly needs
23:35
to happen here. and then our support team will be the ones that are doing the mass update just so that we can make
23:41
sure we know the best way to give you that final solution that you are looking for.
23:47
So that goes over all of the different mass update tools that we have related to memberships.
23:53
It doesn’t look like we have any questions in the Q&A. So I think we’re good on memberships for
23:59
now. So I’m going to transition over into some tips and tricks for financial
24:04
reporting. Um, and just some key reports to focus in on. I’m going to get us started here and then I’m going to pass
24:10
us over to Matt who is our financial product owner on our team. The one
24:16
report that I’m going to touch on is going to be under transactions on the sidebar and it’s going to be our sales
24:22
summary which is really one of the powerhouses of our financial reporting in court reserve. And the reason for
24:28
that is because one we have different preset filters here for this report. And
24:34
two of the key preset filters that we have are going to be cash basis and acrruel basis. So you do have that
24:40
ability to change how revenue is going to be recognized on this report based on
24:46
either cash basis or acrruel basis accounting. But then in addition to that we also have different output types. So
24:53
based on the filters and the parameters that we set on this report we also have different ways that we can break down
24:59
and organize the information that we are taking a look at. So, I’m going to touch on the different output types that we
25:06
have for the sales summary. Just kind of go over the differences you’re going to see between them all, and then I’m going
25:11
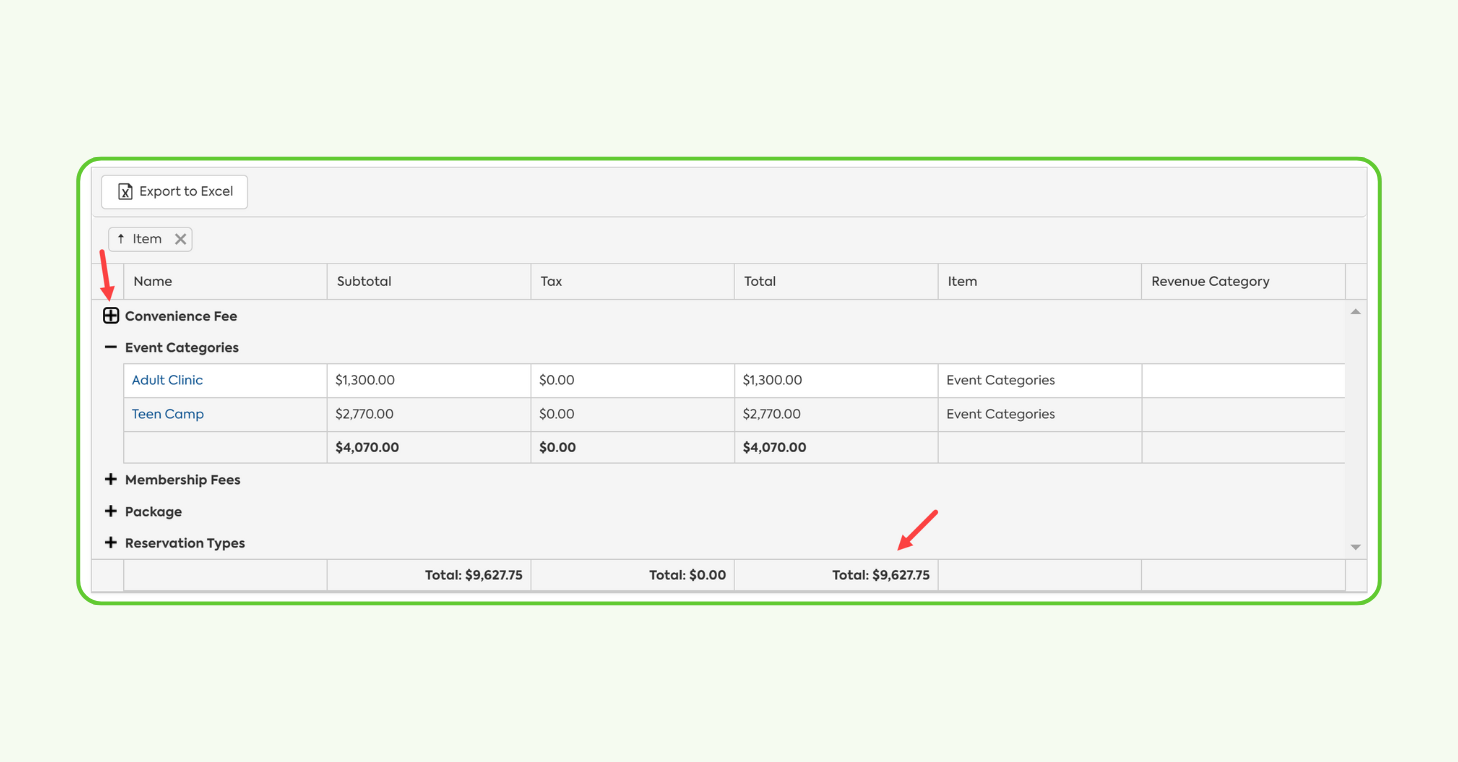
to pass us over to Matt. So, for the first output type, we have the summary output type. And really, how
25:18
this is going to be broken down is by our different fee categories that we have in court reserve. And really, when
25:24
you think of fee categories, you can think of the different services that you may be providing inside of court
25:30
reserve. So, membership fees, events, reservations, point of sale, but then in
25:37
addition to that, we have this menu that you can expand and you can actually look
25:42
at the revenue that is recognized for each type or category within that fee category. So, for example, if we’re
25:49
looking at reservation types, we can look at how much revenue was recognized for each of those different reservation
25:56
types that we have in our organization. The next option that we have is going to
26:02
be our detail output type. This is really going to be the transaction bytransaction breakdown that we are
26:09
seeing based on the time period and the filters that we have set here. So if we
26:15
are maybe trying to get a transaction bytransaction breakdown of this time period and then get that exported, this
26:23
would be a great output type to use in order to get that Excel file. That’s just a transaction bytransaction
26:29
breakdown. We also have our revenue categories output type. If you are using the
26:36
revenue categories tool in court reserve, this is really just a way for you to see all of those different totals
26:42
for each revenue category that you have in your organization. We do also have an
26:48
unassigned category if there’s any revenue that was recognized for a service that doesn’t have a revenue
26:54
category linked to it. So this is a good way to take a look at maybe those
26:59
specific services you have in the system that maybe we accidentally forgot to put a revenue category on. So that’s a great
27:06
way to use this output type. We do also have our sales tax output
27:12
type as well. This is a great way for us to see how much revenue was recognized
27:18
for our exempt sales versus our taxable sales. Um, we can also get the amounts
27:24
for the specific tax rates that we have in our organization if we have multiple
27:30
for any reason. Um, and then we’re also going to be able to see the gross sales and the net sales broken down in this
27:36
output type as well. And then for the last two output types,
27:42
we’re going to have the revenue by payment type. So we can see how much revenue was recognized based off of our
27:49
payments. And then on top of that, based on the different payment types that we are using inside of court reserve. So
27:55
that way we can get that breakdown by those different payment methods.
28:00
And then lastly, we have an output type for our fee categories, which is similar to our summary output type, but is going
28:07
to be a little bit more high level. So here, for example, we’re just looking at total revenue that was recognized in
28:14
membership fees. Um, but we don’t have a way to, you know, break it down by specific membership types. So, this is
28:20
going to be more of a highlevel output type for you. All right. So, that goes over all of the
28:25
different output types for the sales summary. Um, I’m going to pass us over to Matt. He’s going to go over some
28:31
different reports that are going to be helpful for you for the end of the year. All right. Let me stop sharing my
28:37
screen. All right. Thank you, Josh. Great stuff
28:43
there. Okay. Okay. Hello everyone. So, as Josh mentioned, I’m going to take a few minutes to talk through some of the
28:49
end of year cleanup items that we recommend. You can think of these as a few simple housekeeping steps to help
28:55
you close out 2025 cleanly and set yourself up well to start out the new year. Um, now I know there’s a lot of
29:02
things we want to get through in this webinar, so I’m going to hit some of these rather quickly. Uh, but we’ll also
29:07
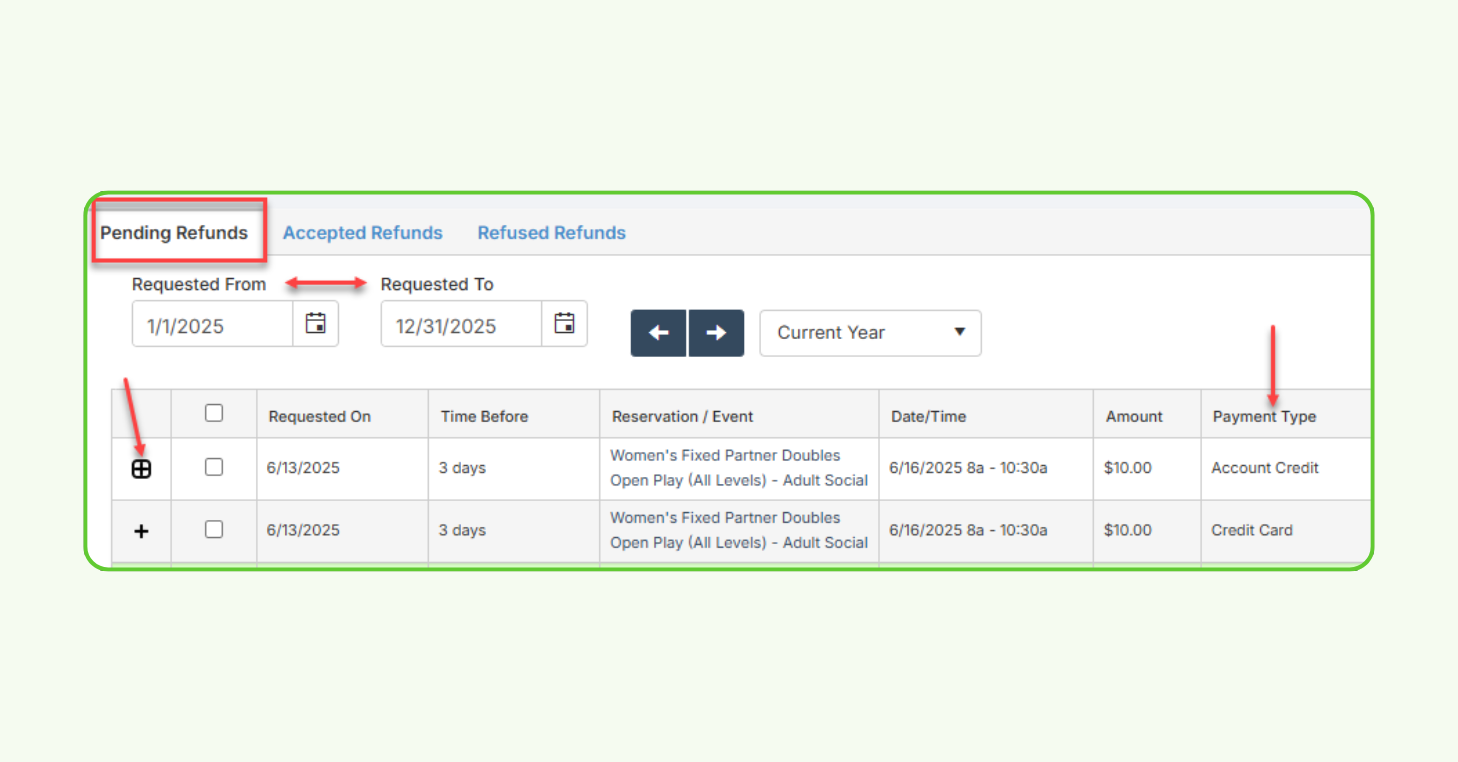
be checking the the questions if anything comes up in Q&A. So, I’m going to start by looking at the refunds page
29:13
under transactions. And as you get towards the end of the year, I think it’s a good idea to start reviewing uh
29:18
any pending refunds to make sure that there’s nothing left hanging. Um even if you already check these periodically, it
29:25
might be good to take a few minutes at the end of the year to go through this list, resolve any refunds that are still
29:30
pending, mark them as either accepted or refused. Uh staying on top of this and
29:36
cleaning it up at the end of the year will help just make sure that your refunds and their related fees are both
29:42
recorded in the same period. Um so then once that’s done, I’d
29:47
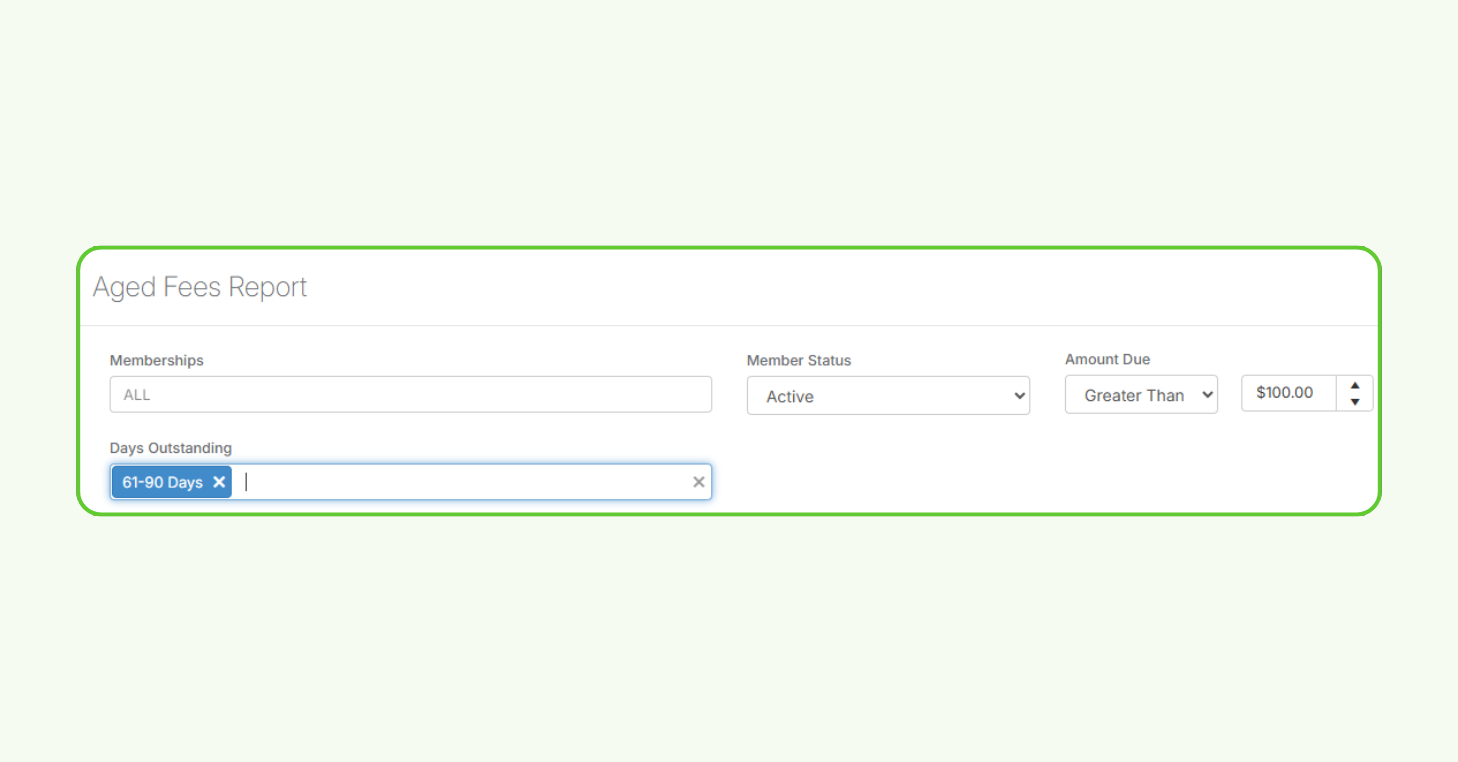
recommend moving over to the aged fees report. Um now this report will show all
29:53
of the aged unpaid fees for members. Um and this is an as of the day you run it
30:00
report. So, you can’t change, you can’t look backwards, like if you were in January, you couldn’t go back and see
30:05
what it was at December 31st, but you can look at it on the day of um check to
30:10
see what your unpaid fees are by member. And you can even filter this if you wanted to see um just everyone that’s
30:18
over 60 days outstanding. Um this will give you a good opportunity to review those members, uh reach out to them, try
30:25
to collect payment where you can. Um, and then also if there’s fees that you know likely won’t be collected, um, you
30:32
can void those or write those off so they’re off your books and you’re starting off the year uh, with a clean
30:37
start. Um, also another step that we like to look to once refunds and HVS fees are
30:45
cleaned up are looking at batch billing. Uh now for clubs that do use this feature, you know, batch billing allow
30:51
you to generate invoices for members and include all the unpaid fees up until a
30:56
specified date. Um so what we would recommend here as a good practice is to run a batch and include everything
31:02
through the end of the year. Um so you would run this in January, but you can
31:08
specify the date either based on the transaction date, the reservation date,
31:13
or you could do both. Um, and that way you know that you’ve got your invoices
31:18
out and captured um for everything up through the end of the year. Uh, this is
31:23
an easy way to have that clean end ofear cutoff and ensure that future invoice batches would only include fees that are
31:31
related to 2026. Um, so those are just kind of some of the key housekeeping items that we
31:37
recommend taking a look through. I I do want to touch briefly on a report that I think is helpful when preparing to meet
31:44
with either your CPA or your accounting firm. So Josh spoke on the sales summary report, which is certainly an important
31:51
and necessary report to have for those meetings, but I would also recommend taking a look at the transaction list.
31:57
And this report is essentially a detailed ledger of every transaction that’s occurred at your club during the
32:04
specific time period. So the the good thing about this one is that you can run
32:09
the report for the full year. Uh you can filter it, sort it, you can export it as needed. Uh which makes it really useful
32:16
when your accountant or CPA asks for, you know, additional documentation during tax time. We all know that
32:22
accountants and CPAs love to ask questions. So we want to be prepared for all of those. Um, and we are adding some
32:28
additional functionality to this report or just some more information um, like that should be coming out before the end
32:35
of the year. So like GL codes um, should show up here as well as a few other things to help you organize and sort
32:41
that information a little bit better. But this report is basically all the raw
32:46
financial data in one place. and being able to organize it by either category or date or member um really makes
32:54
preparing for those those meetings and tax season a little bit easier on you.
32:59
Um and then the last thing I’ll say just as kind of a year-end tip that I like to do for using these reports such as the
33:05
sales summary or transa transaction list is just to take a look at your club’s
33:11
overall performance for the year. Uh you may already be doing this quarterly or monthly, but the year end is a great
33:17
time just to take a step back and see how you did. Uh you can pull up a sales summary for 2025 um as well as 2024 or
33:26
prior year and just compare those reports year-toear. And with that comparison and depending on how your
33:32
information is organized, it can help identify trends or see uh you know where
33:37
did your club grow this year? what programs or revenue categories perform best? Um, are there any areas that you
33:44
could use for more focus or support in the future, for example? So, really the
33:49
goal with these reports are just meant to help give you insights that you need to make informed decisions as you plan
33:55
for next year and also allow you to use the financial data to really understand
34:00
how your club is operating. And uh, yeah, that’s it from me. I think
34:05
Kim I’m Let me just take a look at the questions here um to see if there’s
34:12
anything that we can answer live. There was one question here that I think
34:17
is a good one to call out. So if I have the wrong revenue category for an item for half of the year, is there an easy
34:24
way to fix that in one batch fix? So, when you’re editing revenue categories,
34:29
it is going to retroactively move any fees from that specific service
34:35
or reservation type or event category into that revenue category for you. So,
34:40
you shouldn’t have to do any manual work if there were any services that accidentally did not have a revenue
34:46
category assigned to them. Once you actually assign that revenue category to that specific service, it should adjust
34:54
all of those previous fees so they fit the right category. Awesome. Thank you for answering that
35:00
one live. All right, I’m going to jump in you guys. Aarin, if you want to or um Matt, if you want to stop sharing your
35:05
screen, I will go ahead and add mine up here to the mix. All right, so we’ve talked about
35:12
memberships. We’ve talked about financial reporting. Now, let’s talk about some of the day-to-day operations
35:17
for getting ready for 2026. So, the first thing we’re going to talk about is
35:22
your court costs. So, court costs are always a big hot topic in court reserve just because um core costs can get
35:29
really complicated. So, let’s talk about just kind of um updating your core costs
35:34
and where you would go to do that. Um, so on the left navigation of your admin
35:39
side, you’re going to want to click settings. And then we have this booking settings row here where your court costs
35:46
live. So on my cost tab, you can see my structure of I have three court types
35:52
and I have pricing for each of the different court types. Now you can update these by membership type. So I
35:58
can say my free player is going to be one rate while my all access gold is going to be another. Um, so you can do
36:04
these, you can update these individually by membership type. Now, just keep in mind that these costs right here that
36:11
you see on this table are going to update in real time. So, we do have kind
36:16
of a one tip I want to share with you. If you are looking at just updating a
36:22
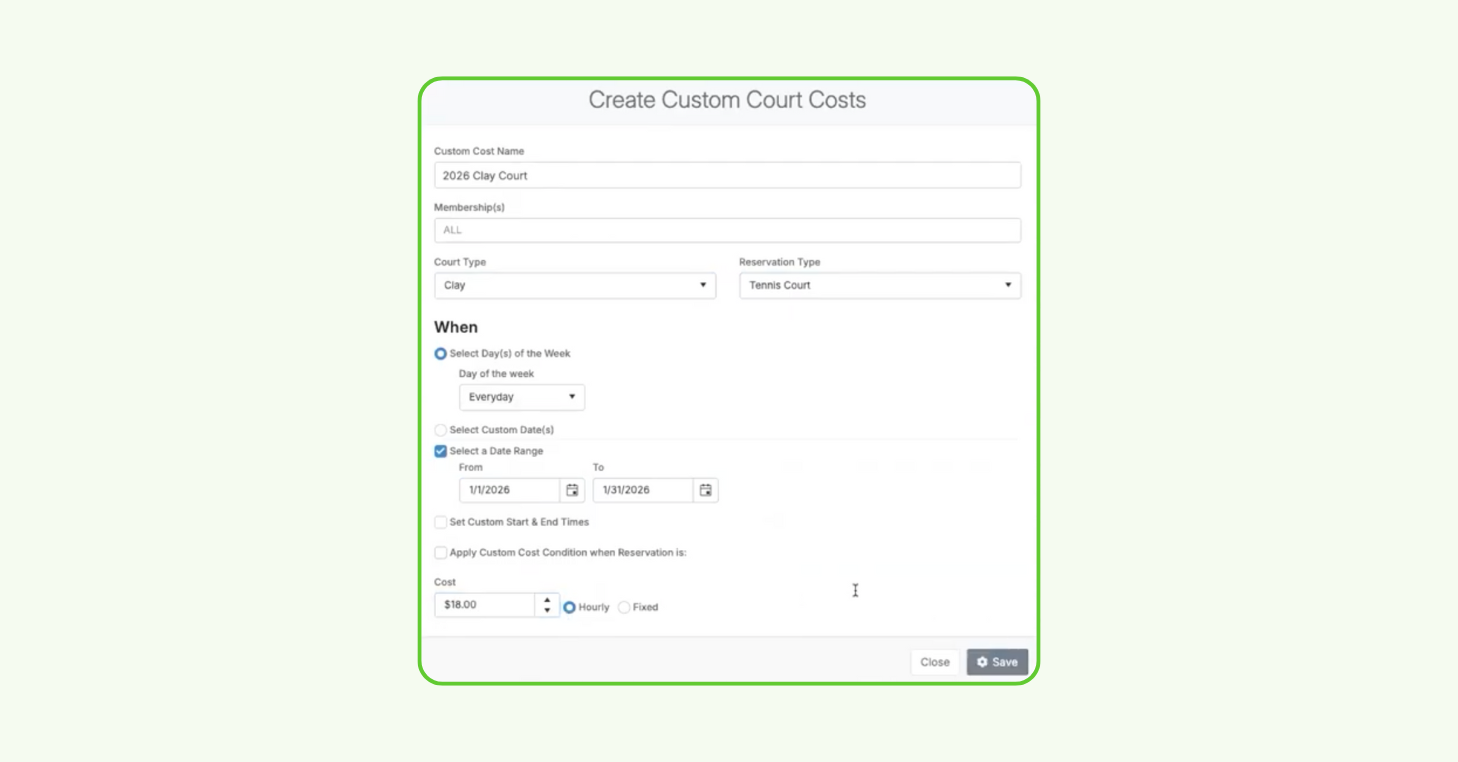
specific court cost to start in 2026, a good way to do that is um with your
36:28
custom court costs. So, while we don’t have really a a dynamic pricing to say
36:34
on this date, set all of my pricing to be this kind of a thing, we do have a way in custom court costs where you can
36:41
set up a custom court cost. And what I would do is basically think of this as like a placeholder. So, when your
36:47
members are going to start booking for that January 1st date, set up a custom
36:52
cost that’s maybe just going to be a temporary cost that is associated with this court type or with this reservation
37:00
type. That will give you time. So, when that when that um date happens, um
37:06
they’re going to be charged the appropriate price. And then once you get to January 1st, you can retro you can go
37:13
back to your court costs table and update all of your pricing for being effective in 2026. And then once you’ve
37:20
done that, after the new year has started, you can then um remove that custom court cost that maybe you set up
37:27
on this page. So if I want to maybe set um as you can see here, I already have one set for my 2026 hard courts. Um, so
37:36
what I did was is I I created a custom court cost for 2026 hard courts with the hardcourt, my tennis court, and then
37:43
making sure every day of the week from January 1st, 2026 to even just giving myself a buffer of a month to do it. Um,
37:50
but if it were me as an admin, I would come in on January 1st or 2nd and update it after it’s already um I’m already in
37:56
the new year. But anyway, so if we want to set up this for a different court type, we would come in here um 26,
38:04
let’s say clay court, and then I would make it effective for my clay quartz.
38:11
And then set that date range to be from January 1st
38:18
to January 31st. And that way again once people start booking on this date they’re going to get the appropriate
38:24
rate that I’m setting for 2026 and then it’s saved in the system. Now
38:30
one of the things that when I pulled our CS team and our customer success team and asked them what are some tips that
38:36
you know you want our our customers to know. So, one of the things was when you actually create a c a custom court cost,
38:43
you can go into that date in the future on your admin side and you can test this court cost without even having to create
38:49
a reservation and save a reservation. So, I’m going to, you know, create a reservation here, but I’m not going to
38:55
save it. So, if I go in and add um a player to this court,
39:01
they should update accordingly uh for the pricing that I set for this court
39:06
type. Um, so I don’t remember what that rate was. So if I set it for 1350 for my
39:12
hard courts. Yep. So it looks like on I’m booking this on January 2nd, 2026, you can see that 1350 rate is applied
39:19
here. And so I know that that court cost that I set on my custom courts is correct. So that’s just one way that you
39:26
can go in and just kind of preempt the system in order to make sure that once people start booking on January 1st,
39:32
they’re getting the appropriate rate for their reservations. Um, now I do know that some clubs have some quite
39:39
extensive custom court costs. Um, and so if you would like to kind of walk through how to get those updated for
39:45
2026 appropriately. Um, since a lot more of those are more complicated setups, I would recommend reaching out to our
39:51
customer success team and they can help you with some tips tips and tricks on setting up those custom costs when you
39:56
have a more complicated structure. So the next one that I want to touch on is lesson pricing. Um, so with lesson
40:05
pricing, I have a little bit different of a recommendation. With lesson pricing, I actually I actually recommend
40:11
setting up different lesson pricings per year. Um, lesson pricings, you know, you might increase them as of January 1st.
40:18
And you want to make sure that when your admins are booking lessons or when your pros are booking lessons for players
40:24
after January 1st, they’re getting the correct rate. Now, setting up those 2026 private lessons as their own reservation
40:32
type or I’m sorry, as their own lesson type will give you that flexibility to really set those up ahead of time. And
40:37
then, you know, as of January 1, your front desk or your pros are going to be booking the correct rate as long as
40:44
they’re selecting the correct lesson type. So, as you can see here, I have my 2025 lessons and my 2026 lessons. This
40:51
is also a good way for you to then guarant, you know, get your financial reporting by these lessons. um as well
40:57
once you get into 2026 and keep them separated from 2025. So, I have all of
41:02
my lesson types set up. Once you have your 2026 lesson types set up, don’t forget to add them to your instructors.
41:08
Um because in order to then set the pricing, we have to make sure that the pro qualifies for that lesson type as
41:14
well. So, to do that, you’re going to go to your instructor settings row and your
41:20
instructor pricing. And so then on instructor pricing, you can um select
41:25
your pros individually, you can see I have all of my 2025 lessons here. And then in my 2026
41:32
lessons, I’ve actually already gone in and set the pricing for them. So setting the pricing then across the board for
41:38
all of these lessons. And now my lessons are ready to book for 2026. And my pros can start getting those lessons on the
41:44
on the calendar for that time period. I did want to talk about um reoccurring
41:51
lessons. Um so and and again this scheduling restrictions page right here. This is actually a quick way where you
41:56
can add pros to specific lesson types that you’ve added more quickly. So just keep this in mind if you have a lot of
42:02
pros, go to that scheduling restrictions page and you can um quickly add those pros to more lesson types. So, with
42:09
reoccurring lessons, if you do have reoccurring lessons that are going to be booked into the new year, um you have a
42:17
couple of options. You could go in and edit those reoccurring lessons to stop as of January or December 31st and then
42:24
start a new series for those players as of January 1st with a new lesson type so they pick up that new pricing. Just keep
42:30
in mind that the pricing for reoccurring lessons um is going to be based on uh
42:37
the the lesson that’s boo or the the date that’s booked. So you can actually go in and update based on the entire
42:43
remaining series or you can update based on a specific date. So if you went in to edit, let’s say you didn’t want to lose
42:49
that reoccurring series, you may want to go in after, you know, as of January 1 and update pricing going forward. But
42:56
again, I I more so recommend uh keeping those lesson types separate for instructors just so you can keep their
43:02
books clean and accounting clean and all of your commissions and things like that clean for the new year.
43:08
All right, so that’s um kind and oh and the next thing I wanted to talk about was book a pro. So um again, if you are
43:16
creating new lesson types for instructor lessons in 2026, I also remember
43:21
recommend taking look taking a look at that book a pro scheduleuler. So, as you can see here, I have two Booka Pro
43:28
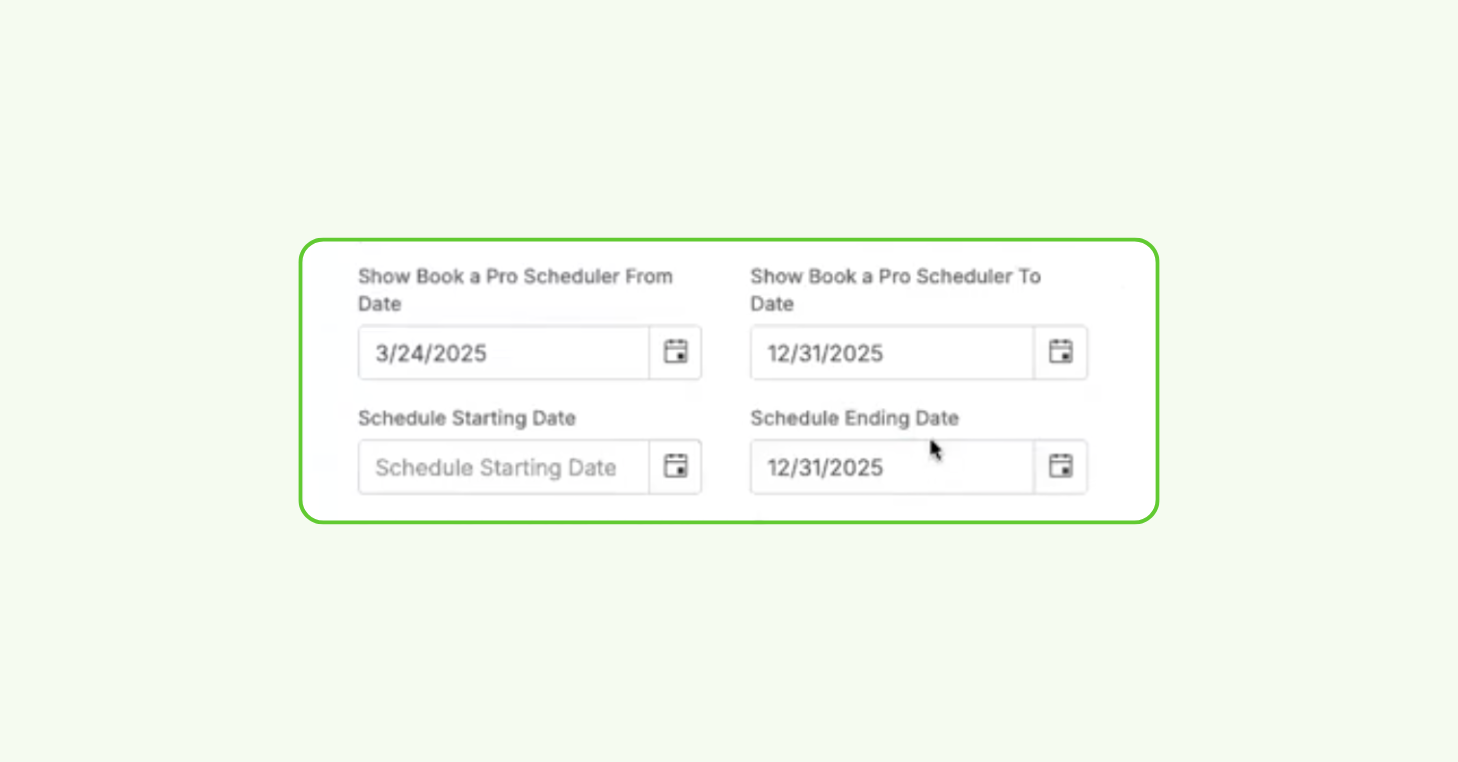
schedulers. One set up for 2025 and one set up for 2026. You can actually time
43:33
these to make sure that they cut off on a specific date. So, mine’s titled for
43:38
2025. If I scroll down to the bottom, you can actually um choose what date
43:46
that these Booka Proers, similar to your custom schedulers, what date that they’re turning off. So, I can go in
43:52
here and I can say don’t allow anybody to don’t allow anybody to see thisuler past December 31st. And then also, don’t
43:59
allow anybody to schedule a lesson on thisuler past December 31st as well. So, make
44:05
sure if you are using Booker Pro schedulers and you’re switching things over to 2026 that you do go and end
44:11
these. That will prevent anybody from booking anything in the member portal past the new year or through through the
44:18
new year. and you would want to save those. And then I’ve created myself a new Book of Prouler for 2026. So myuler
44:26
for 2026 now has all of my 2026 le 2026 lesson types on it. And it’s set up
44:31
appropriate based on the needs that I have for my pros and my Book of Prouler. And then as you can see, I’ve chosen to
44:38
show it based on a specific day. So I did it as of today so I could show you all what that looks like in the member
44:43
portal here in a second. And then um I’m allowing them to schedule starting like
44:48
21 days out. So allowing them to schedule starting December 11th. Um and
44:53
that’s all kind of based on some of the settings that I did here. So days in advance to show instructor availability
44:58
21 days time in advance uh instructors can be scheduled stuff like that. So just make sure your dates are all in
45:05
alignment there. But then once I go into the member portal and I’m looking at um
45:11
my portal here, I’ve got this book a pro lessons tab. So once you have more than one book a pro scheduleuler created,
45:17
you’re going to get this nice cleaner tab here. And then when players go and click on it, they can get into that 2026
45:23
space or the 2025 space. So because I’m in 2026 right now, no
45:29
lessons can be booked. It’s just going to show as unavailable. But then your players can flip back to 2025 if they
45:35
want to continue booking lessons through the end of the year and then continue to book accordingly.
45:42
All right. Well, that’s lessons. I don’t see any um additional questions coming
45:49
in. So, I’m going to move on to events. So, we get a lot of questions about events,
45:55
like I’m going to be updating my pricing for the new year. How do I go about doing that? Um, so for events, we did
46:02
release this year a tool that will allow you to mass update your event pricing
46:09
kind of all in one swoop where you can pick and choose events that you want to mass update. So, as you can see here, I
46:14
I don’t have as many events as a lot of our clubs do. I only have 21 events here, but just keep in mind that when
46:20
you update event pricing, you’re updating it from that date forward. So, a good practice of a lot of that a lot
46:26
of clubs do is they rotate their events, you know, create events based um and
46:31
maybe try and end them by the end of the year. So, I want to make sure that really all of my events are ending as of
46:37
um Janu or December 31st and then start my new events in the new year based on
46:42
whatever schedule that I offer, maybe um winter sessions, spring sessions, fall
46:47
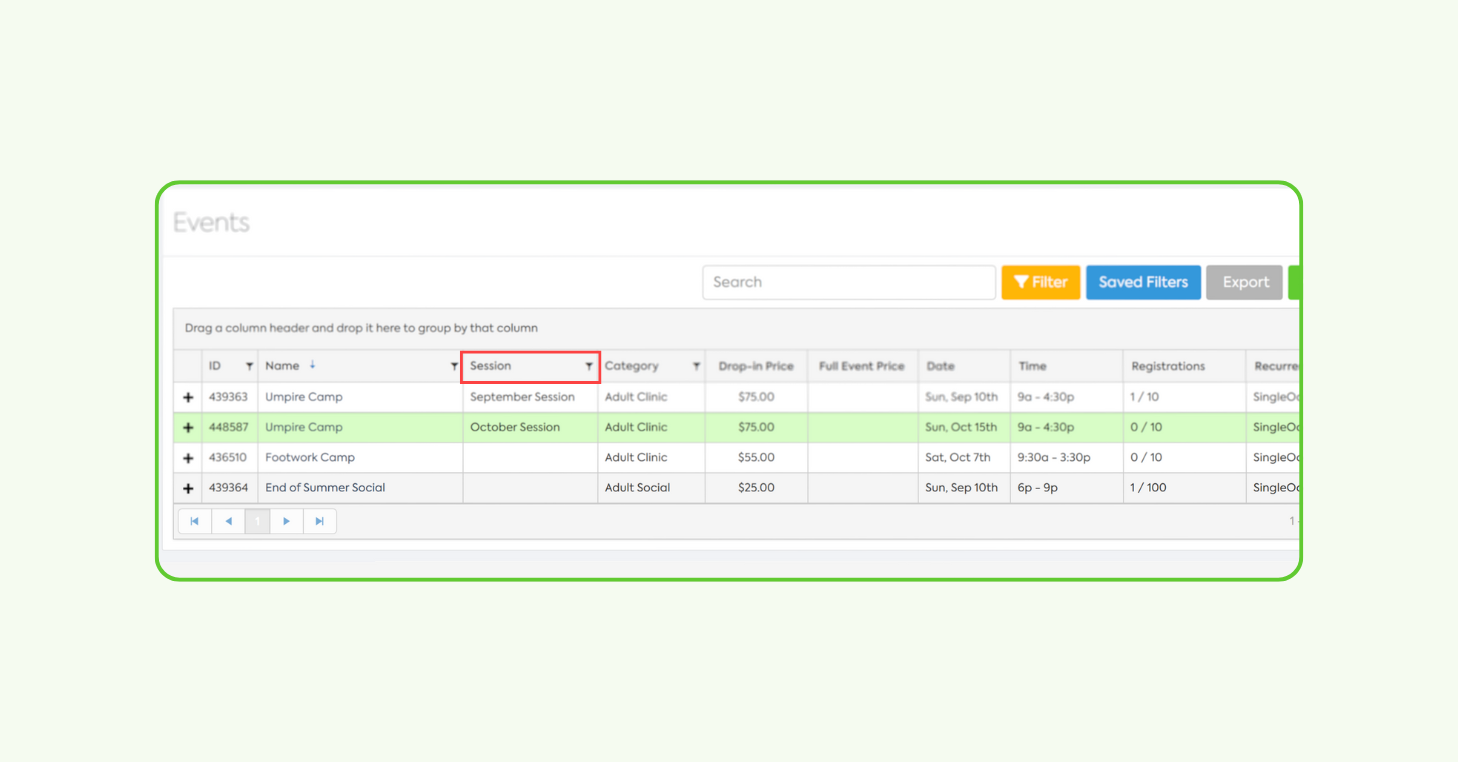
sessions, and things like that. Another thing I recommend doing with events is making sure that you’re using sessions.
46:54
Sessions aren’t something that I think a lot of clubs are using widely, but I highly recommend it. You can do a lot of
46:59
things with sessions. Um, I actually posted this on the admin community group not too long ago. Um, really the biggest
47:06
difference between categories and sessions and things like and using tags.
47:11
And the best practice I can I can recommend for sessions is think of it as as a all-encompassing like it’s it’s a
47:19
so you have your event categories and those limit the specific categories to one category per event but then if you
47:25
have a session you can actually add the session tag to an event and then in all
47:31
of the different financial reporting and a lot of the different event details reports and things like that you’re
47:36
going to have you can use this session as a filter and it’s going to filter every event that has that session tagged
47:43
with it. So, it’s super useful in a lot of your financial reporting. So, if you’re not using sessions on your
47:48
events, I highly recommend you start doing that into 2026. It again, it allows you to really um group a lot of
47:56
different event categories together. So, maybe you have adult clinics, you have adult leagues, and you have um you know,
48:03
adult socials. And so you could actually add a session tag to all of those categories and all of your different
48:10
events maybe that are happening in that time period and you can get a good snapshot in financial reporting of the
48:16
health and overall um the things you know the health of your how your programming is doing for that time
48:21
period of the year. So definitely check out sessions. All right. So then that brings me back
48:27
to pricing here with events. So with events, prior to the release that we did earlier this year for mass updating
48:33
events, the only way to update events was in real time on the event pricing.
48:38
So again, if you’re ending all of your events in um at the end of 2025, you
48:43
want to create new events for 2026, but let’s say the last minute you’ve decided you’re going to update all of your
48:49
pricing and so you need to go in and you need to work a little bit backwards. Well, then rather having you update a hundred events at a time or
48:55
individually, um we’ve given you a tool here. So, if you go into events and mass update down here under the other actions
49:01
under events, you’re going to go to this mass update events page. Now, the mass
49:07
update events page, we do have plans for it. Um, the necessity of this feature actually came about because of network
49:13
memberships that we released earlier this year, but we wanted to give clubs away initially here to mass update
49:19
pricing or mass update visibility of events across the board um in one swoop.
49:24
So, what you want to do with mass update events is you want to you have to have at least a start date or an end date in
49:30
there. But if I wanted to go in here and let’s say I just I realized I set the wrong pricing for some of my dropin
49:35
events in 2026. I want to go in and update them. So, I could come in here and look for all of my events in 2026
49:42
and just start selecting, you know, which events I want to update. And then what I’m going to do is I’m going to
49:48
update my membership fields because in events in court reserve all of the pricing is related and all of the
49:54
visibility and when an event can start registration and stuff. It’s all tied to the membership. So what you would want
50:01
to do is now if you’re adding memberships, this is another good tip. So, if you’re adding new memberships for
50:06
2026, you can actually come into um mass update events and you can copy rules
50:12
from maybe an event that or a membership that you already had existing and then copy them to a new membership that
50:18
you’ve set up for 2026. So, definitely check that out if you’re adding new memberships. We also have a great
50:24
article um that goes over all of the features here. I’m giving you guys a high level as we go through. But then
50:30
the other thing that you can do with this is you can manually update based on specific membership types. So let’s say
50:36
I, you know, decided again I want to update all of the pricing for 2026 for all of the events that I’ve already
50:42
created. I just want to update that drop in price though. So I want to take that drop in price up maybe, you know, $2. So
50:49
I would update all of my pricing for my dropins to be $20.
50:55
And then let’s say I also forgot to make them all public, you know. So, if you want to make them all public, you can
51:01
actually u make sure you’re hitting specific fields and enabling these fields. And so, then I can make sure
51:06
that I’ve actually made all of my 2026 events public. So, there’s a lot of
51:11
powerful things that you can do here. You can update your pricing. Um, you can actually, you know, choose maybe
51:17
specific event categories and, you know, just say all of these these fields are going to update. So, just make sure if
51:23
you’re picking all fields, all fields are going to update exactly as they are here. If you’re choosing specific
51:29
fields, um, you can actually turn on and turn off which features that you’re going to update about those events.
51:36
Um, I get a lot of questions about, oh, can we do a start time from this? Can we update um, other pieces of events from
51:43
this? Yes, we do have plans to build out, you know, more features um, but more action types using mass update
51:49
events. Um, but, you know, these are the features that we have now. So you can update membership fields again, which is
51:55
all of the fe all of the items on this row. And you can actually go in and you can update your guest setup for these
52:00
events as well. Enabling guests um and changing your guest rates on all of the events as well. So then if I update all
52:08
of my pricing here to be drop in price of $20, let me just mass update that. It’s going to tell me how many which
52:14
memberships that I’m doing it for, the fields that I’m doing, and then um which
52:20
drop in field or which fields specifically. And it tells me that I’ve already selected three events. So then
52:25
after I do that, I can actually it’s going to show me an audit log of what I did here. And I can click this three and
52:32
it’s going to show me all of the events that I affected. And then again, I can go through and I can, you know, just
52:38
double check and click those events and make sure that those prices did update accordingly. Wow, I jacked that quite up
52:44
a bit, didn’t I? Um, so that’s just one way that you can use mass update events to kind of update all of your pricing.
52:51
Just keep in mind if you are mass updating events for um events that are still happening this year, if you go in
52:58
and mass update an event that is happening tomorrow but still carries into 2026, you’re going to change that
53:03
pricing as of tomorrow. So just make sure that’s another reason why you might want to separate your pricing or your um
53:10
not your pricing, you might want to separate your um end dates on events so you have a clean line between the end of
53:15
2025, the beginning of 2026. Again, it just makes financial accounting and, you know, your cleanup for the year a lot
53:22
simpler when you have those hard cut off dates for events. All right, I don’t see any questions.
53:30
So, we’re at 153. I’m going to quickly kind of go through this next piece. Um,
53:35
we have waivers. So, in court reserve, you just want to make sure that those waivers are set up prior to your 2026
53:43
season starting. So now would be a good time to check with your lawyers, check with your um general counsel to make
53:49
sure that there’s no waiver updates that they want to make in the new year. If they do, go ahead and get those waivers
53:55
u submitted immediately, you know, to court reserve so players can start signing them if they need to. One of the
54:01
things I do recommend is creating a different waiver for each year. That way when you’re going back and looking
54:06
historically at players and the waivers they’ve signed, those waivers are um yearly specific. So, it’s really easy to
54:13
see which waivers that the player has and if you need to pull them for any reason, you can pull the correct one.
54:20
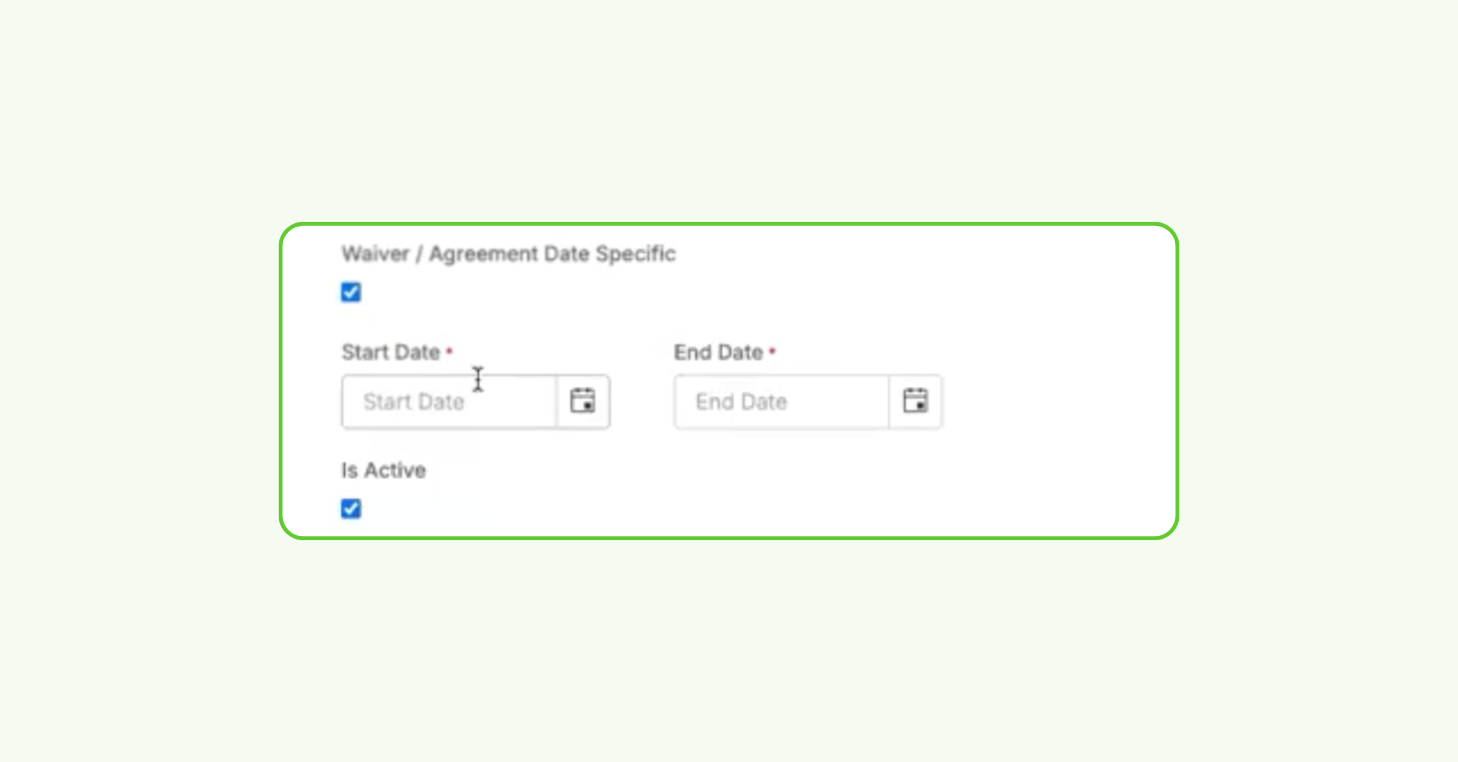
Another thing with waivers um is I want to show people this this date, right?
54:25
This setting right here. I don’t think it’s a very widely used date. The CS team did caution me and showing in and
54:31
talking through this setting, but basically you can set your waiver to be date specific. So, if I have a general
54:38
liability waiver for 2026 and I want to make sure that players are only signing this waiver if they’re participating in
54:45
something in 2026, I can actually set this waiver to be just for the year 2026
54:51
with a start date of January 1st, 2026 and ending December 31st of 2026. What
54:57
does that do? Well, if the I have a 2025 waiver, also dated for the proper dates
55:02
of 2025, the player comes in tomorrow, registers for an event, they’re going to
55:08
sign my liability waiver for 2025, but then if they turn around tomorrow and
55:13
sign up for something a month from now, they’re going to be presented with the proper waiver for 2026. So again, it’s
55:19
another way of making sure that players are signing their waivers at the appropriate time for the appropriate events.
55:26
And then the next thing that you can do here is remember we have the signing rules. So the signing rules determine if
55:32
the waiver is presented at the time of booking, if it’s optional or required, and then upon login. So if you’re
55:38
requiring um and then also we have the agreement period. Sorry, I meant to hit the agreement period, not the waiver
55:45
presented on. Um the agreement period is actually a good one to make sure that you’re doing. Um, and depending on your
55:51
business rules, it might just depend on how you want this to work, but we have every calendar year on here. We have every new disclosure version. I always
55:59
recommend using new disclosure version. That way, if your legal team tells you halfway through the year, hey, we need
56:05
to add something to the waiverss. Um, that way you can add another version of your waiver, and then the next time your
56:11
players log in, they’re going to be prompted to sign that waiver again. So, it allows you to create that, you know,
56:17
have that ongoing maintenance of a waiver throughout the year if you need to. Um, if you have it posted to every
56:24
calendar year, it’s just going to have the players sign them every year. And if there’s a new version put in, the player’s not going to be prompted to
56:30
sign it. So, just keep that in mind. Um, all right. Where am I at? Four
56:35
minutes. Cool. Let’s talk really quickly. I wanted to go over just
56:41
something really, really small with um the member portal settings. And if we go over a few minutes, everybody’s welcome
56:46
to stick around. I will be here. Um, so one of the things that you can do to
56:51
prepare your member portal for 2026. And one of the things I always like to do as an admin is to make your member portal,
56:58
you know, just really easy for players to navigate and figure out what’s going on. So, as you can see in my in my
57:04
portal here, I have actually added a link to the top with my 2025 fall schedule. Well, let’s say I wanted to
57:10
set one of these up for 2026. It’s super easy to do using the event filters that
57:15
we have in your website settings. So, you want to go back into your admin
57:20
side, click on website. Up here on the menu link up at the top,
57:25
the menu tab, I have the ability to create a header link. So, to do this,
57:30
this adult clinics for the fall schedule, I actually added a header link here called adult clinics. And then I
57:37
created sublinks for these adult clinics. Well, what link did I use to get this? That’s a great question. So,
57:43
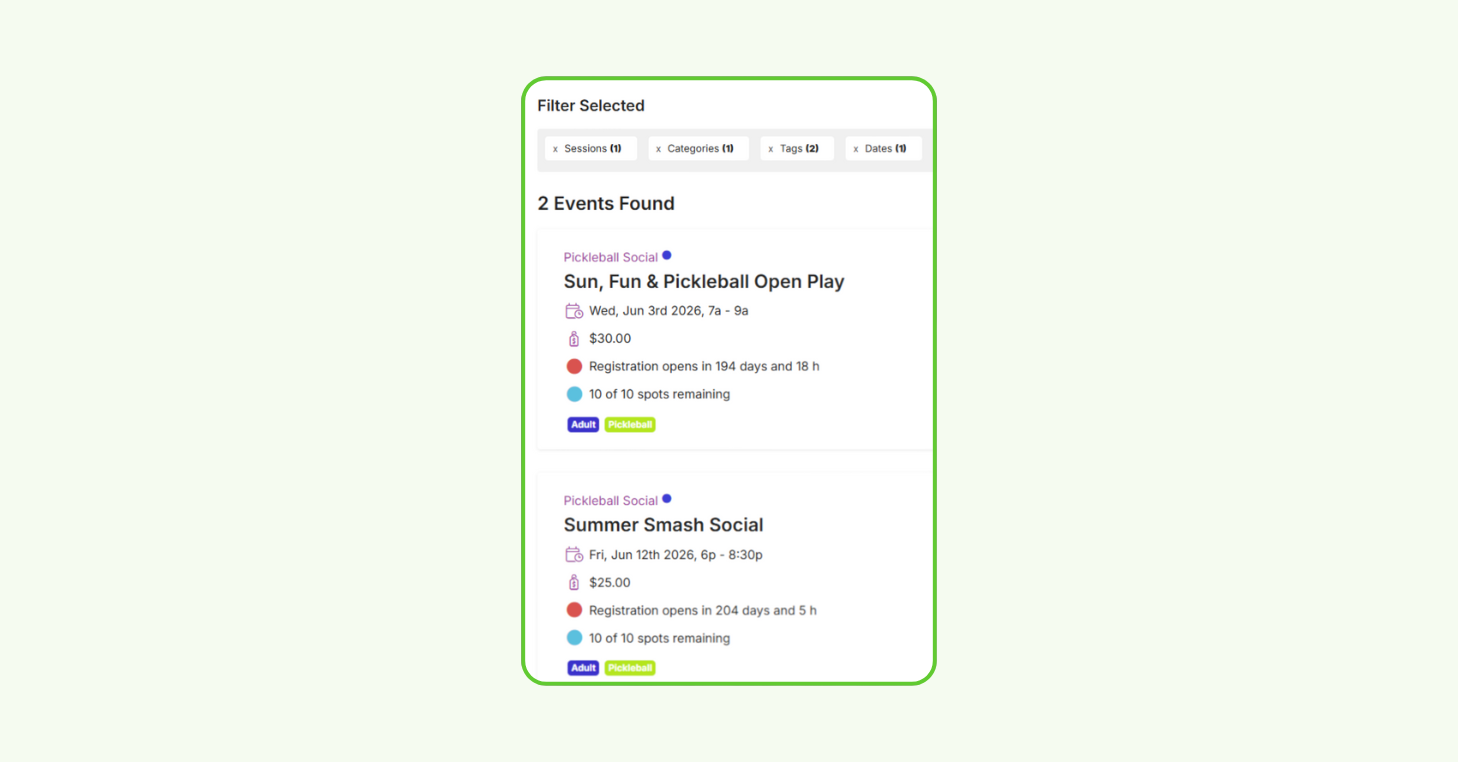
let’s jump over to event filters. If I go over to event filters, I can create
57:49
myself event filters that allow me to give my my players that are looking
57:54
through my member portal. Um, hold on. Let me just can’t talk and type
58:01
at the same time. Okay. So, a custom event fil or creating
58:06
event filter just presets a filter. Basically, when I was an admin, I called them preset filters, but it presets a
58:12
filter on the member portal so that when your players click a schedule here that you’ve created, the 2025 fall schedule,
58:18
they’re going to see a fil pre prefiltered list of events that I want them to see. So, for 2026 spring
58:24
schedule, what I always did as an admin is I would come in here and I would just call it what I wanted to. I would label
58:31
it by session. So, now it’s only going to show my winter events for January and
58:36
March. Let’s call this winter
58:43
and then hit save. I’m not going to add any other filters here because I just want to show every event that I have created that’s going to be during that
58:50
time period. And I’ve already tagged all of my events with those sessions as well. Once you save that filter, you can
58:56
copy that URL and you can go back over to your website settings
59:03
and into that menu. And under adult clinics, you can create or the adult the
59:08
menu item that I created. Um, I just created uh I just created a new a new sublink. So, I’m going to call this one
59:15
2026 uh winter schedule.
59:22
And I’m going to paste in that URL that I just created from the previous uh page. So then if I come back over here
59:29
to my member portal and refresh, now under adult clinics, I’m going to have two schedules. So, if you haven’t
59:36
unlocked the power of these filtered lists, please go play with them. I presented these at Catalyst a couple
59:42
months ago. Um, and everybody was just like, “Oh my gosh, I had no idea that we could actually send a targeted link to
59:47
people with specific types of events.” And you can do a lot more with this, too. You can actually filter it down to
59:54
um the event events with a specific name, like keywords. So, I actually So,
59:59
pre-filled search option. So, I used to set up all of my summer camps based on an event filter. They would all my
1:00:05
summer camps had summer camp in the name of them. And so I would just do pre-filtered search options summer camp
1:00:11
and I would create an eventless filter that had all of my summer camps in them. So when people navigated in my portal,
1:00:17
they could clearly see all of my my summer camps. So I think we’re going to do a kind of summer camp best practices
1:00:23
in the spring, but um you know using event filters in 2026 is also a great
1:00:29
idea. All right. Well, we are right at 2:00. Um, I wanted to hit one more item if
1:00:37
anybody’s still sticking around to listen to me, but if you don’t want to stick around, we are going to post this on YouTube within 24 hours of the
1:00:43
webinar being over. I did answer a question on that earlier, but I just want to remind everybody this will go up on our YouTube channel in in about 24
1:00:49
hours. So, if you need to jump off, go for it. You can check out the end of it on YouTube later. Um, but the next thing
1:00:55
I just want to hit with people is um just some of the communications that we offer at Court Reserve to how to communicate with your members in 2026.
1:01:02
We already mentioned the emails webinar and marketing webinar that we’re doing in December. So, that’s a great one to
1:01:07
learn how to email players and our new bulk email feature that we’ve created that’s coming out soon. Um, but just
1:01:13
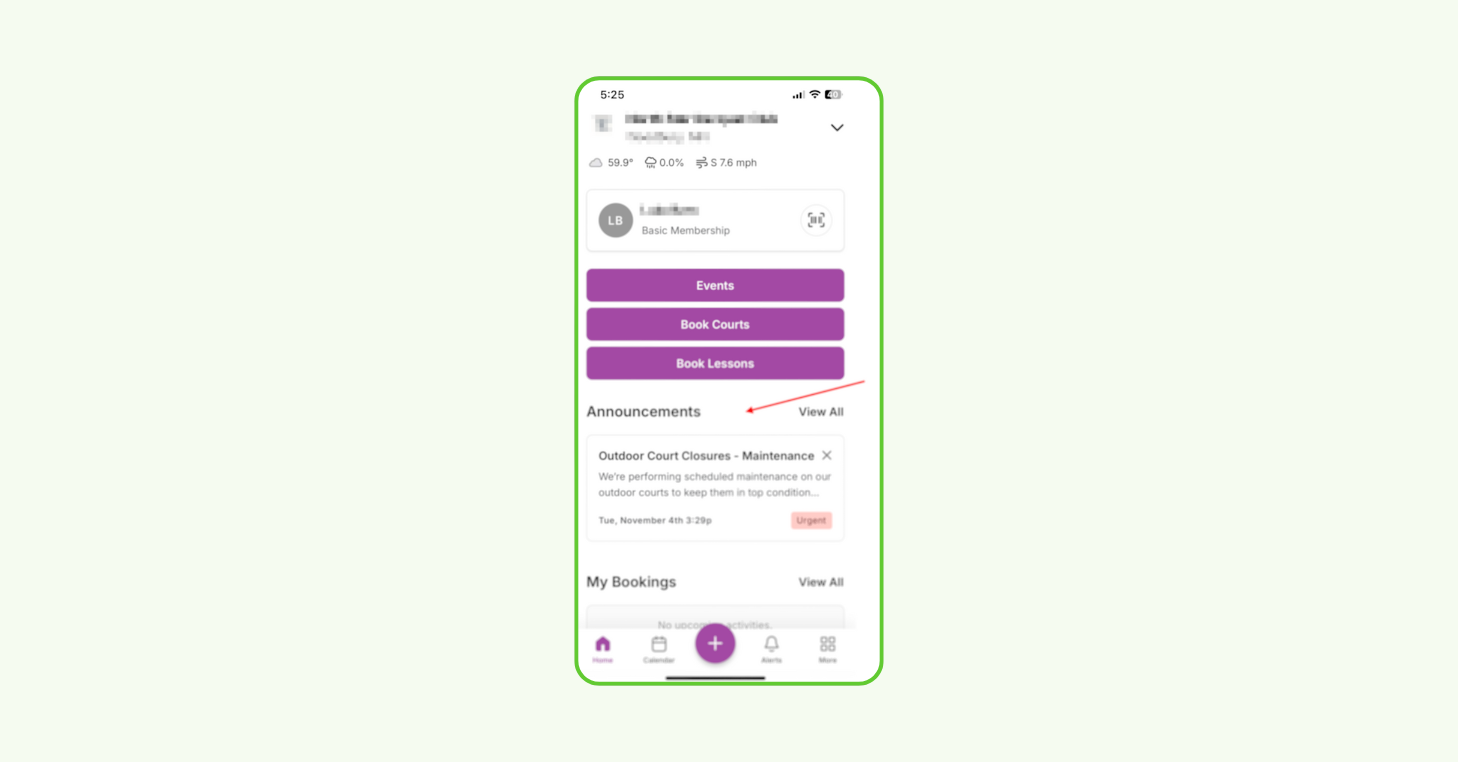
remember you’ve got global announcements. How do I use global announcements? Global announcements are a um announcement that you can put out
1:01:20
there to your members via desktop or the mobile app to where it’s going to appear on their loggedin mobile app view. So
1:01:27
once they log into their app on court reserve or your branded mobile app, there’s actually a row at the top. It’s
1:01:32
the first row that they see called announcements. So if you have general announcements where you’ve, you know,
1:01:38
you’ve opened up registration for the fall se or the spring session, you know, you can throw an announcement up there. If leagues are open, go ahead and throw
1:01:44
announcements up there. When people are looking at their app, they’re going to see that announcements row. They’ll be able to look at the announcements that
1:01:50
you’ve put out at the club. It’s another great way to let people know about weather. If the courts are closed, you’re snowed in, you can’t get to the
1:01:56
club. um you know what the status is with all of that. So definitely check out global announcements if you’re not using it.
1:02:03
Um the next one that I want to hit is actually going to be the um text messages and push notifications. So
1:02:10
under the notifications tab on your admin side, you have this player and system users. Now, if you haven’t
1:02:16
already enabled um the advanced communication suite, I think from
1:02:22
additional um if you go into not stringing, if you go into settings um down here, we have
1:02:32
additional features. If you’re on legacy, this is called add-ons, the legacy pricing subscription model. If you are on um our new tier pricing
1:02:40
structures as of last year, then you it’s called additional features. So, you
1:02:46
actually have these features um that are broken up separately. You have push notification alerts and text messages.
1:02:52
If you’re not using push notification alerts, please go turn them on. We think everybody should be using push
1:02:58
notification alerts. And what is a push notification? A push notification is a notification that you can send to
1:03:04
players through their court reserve app. Now, it’s their court reserve app or their branded mobile app. Either one, they’re going to get that message. So,
1:03:10
push notifications. Once you enable push notifications, they are free to use.
1:03:16
Okay, you can send 10,000 push notifications and you won’t be charged
1:03:21
anything. Okay, so push notifications are a great way to get people notices to their phones. I get them all day long
1:03:27
from retailers, so I know that they work. Um, and so you can build a push notification, send it to players, and
1:03:33
then also text messages are a great way. you know, text messages do have an additional cost to them. So, just keep
1:03:39
that in mind if you’re using a lot of text messages. But under text messages and push
1:03:45
notifications, again, go back to um your settings page on notifications.
1:03:51
You’ve got your player notifications. Let’s talk about texting and push. Okay. Go to the push notifications and just
1:03:58
enable all of them because then your player’s going to get all of those notices from email and everything that
1:04:03
they’re getting via email. They’re also going to get it to push. Make sure it’s active and subscribed.
1:04:09
Now, players with the app do have to allow their phone to accept push
1:04:15
notifications on that app. So, just keep that in mind, too. Um, so push notifications are a good way to
1:04:20
communicate with players, but they can also turn them off. So, they do have to make sure that they’re enabled on their side. With text messages, you can also
1:04:27
pick and choose. So, I used to only use text messages for the really really important alerts like to um let them
1:04:33
know about a cancellation or a weather closure or something like that. So, definitely pick and choose which text messages that you’re using because there
1:04:39
is an associated cost with those once you go over a certain period or a certain amount.
1:04:45
Um but yeah, definitely use those push notifications for marketing and things like that.
1:04:51
Um all right. Well, are there some questions here that we can answer? I kind of got through that notifications
1:04:57
piece really quickly. Um, but let’s see what we’ve got. Josh, yeah, it looks like we do have some
1:05:02
questions here about unsubscribing from those different notification types. Um, so if a player unsubscribes to
1:05:09
everything, can I still not send them an email? So, I think this may have to do
1:05:14
with the notification subscription and then also sort of the
1:05:19
difference between receiving notifications and a bulk email and how players may be able to unsubscribe from
1:05:26
them. Okay, cool. So, do you want to take this one or do you want me? Um, yeah. So, I can just say that the
1:05:33
the notification check boxes um are going to have to do with any automated message that is being sent to a player
1:05:41
based on some sort of action. So, for example, reservation confirmation. I received that after I finish booking a
1:05:47
reservation. So, if we’re unchecking the notification subscription, that won’t
1:05:52
actually impact my ability to receive a bulk email that’s sort of manually sent
1:05:58
out from an admin. But with that being said, players do have a way to unsubscribe from marketing emails, which
1:06:05
would be any of those bulk emails that we’re talking about. So, if you went to a players account,
1:06:12
um, near the bottom of that page, let’s see here,
1:06:20
there is going to be the unsubscribe from my club/organizations, emails,
1:06:26
alerts, and newsletters. So, if they did click this setting here, it would stop
1:06:31
them from receiving any notifications and any bulk emails. So,
1:06:37
just wanted to point those out. On the player side, that lives under their personal information. So, if I
1:06:43
scroll down here, I can unsubscribe from my clubs, organization, emails, and newsletters. Again, that’s like Josh
1:06:49
just said, that’s going to only unsubscribe them from these bulk messages. So over here on the lefth hand
1:06:55
side, if I go to members, I have bulk email, bulk text, and bulk push, that’s only going to unsubscribe them from
1:07:01
those. Um, they can also actually pick and choose what notifications they want
1:07:06
to turn on and off as well. Um, so they can pick and choose if they don’t want
1:07:12
to receive a confirmation or something. So sometimes when people aren’t getting things, we also recommend having the player go look at their notifications
1:07:18
table to make sure they haven’t turned off a system notification as well. um because they they they can pick and
1:07:25
choose which ones. Um but they don’t usually go in and do it. They’re usually unsubscribing from those bulk emails and
1:07:32
things like that. That’s a great question.
1:07:37
All right. Um is there a way for players to resubscribe in the future? This has been a problem for us and people come
1:07:43
and go from our club at Hinders Communications. Yeah, that’s a great question. So they can resubscribe to
1:07:48
those bulk notifications here in their portal. Um so you would want to have
1:07:53
direct them to the player information whether it’s on their mobile app or it’s on the desktop and they can make sure
1:08:00
that they’re subscribed. The other thing to do with push notifications
1:08:05
um is to make sure that the player has enabled them on their device. And so
1:08:11
that can be a little bit harder sometimes to walk them through how to do. Um, I think I actually have that’s
1:08:17
in the push notification article. I think it kind of outlines what to do, but I know on I have an Apple device, so
1:08:24
I have my iPhone. Um, I have to go to actually the notification section within my iPhone and I find the court reserve
1:08:30
app there and then I can pick which notifications or the notification types that I’m allowing for court reserve to
1:08:37
my phone. So, um, I would choose, you know, enabling notifications and then I I get all of them. So, I get the banner
1:08:43
notifications, the sound, and the badges and all of that. Um, so you just it kind of depends on what device you’re using
1:08:49
to make sure that they have those push notifications enabled. And then when they when they initially download the
1:08:55
court reserve app or they download the branded mobile app, they’re going to be asked by the app or they’re going to be
1:09:01
asked by the device itself if the device wants to accept push notifications from this app. Um, so you’re kind of at the
1:09:07
mercy of the player to make sure that they hit accept. Um, but I I accept them at this point for most of the ones that
1:09:13
I communicate with regularly. Um, all right. Are we able to talk about
1:09:20
resubscribe them on the member side if they don’t have it themselves? Um, oh, I would have to remember this. I
1:09:26
believe if they have unsubscribed from marketing emails, Josh, please
1:09:31
correct me if I’m wrong, but I think if they’ve unsubscribed from marketing emails, you cannot resubscribe them as
1:09:37
an admin. Is that correct? I believe so. I know that is the case with text alerts.
1:09:44
Yeah, with text alerts, if they have unsubscribed um from the text messages, you cannot resubscribe them. And once
1:09:52
they have declined push notifications, I believe that the admin cannot um enable
1:09:58
them for them again um from the admin side. They do have to do that from the device itself.
1:10:06
So, if you run into any questions with that, just reach out to our support team because um there’s a lot of different
1:10:11
troubleshooting things that we can do with notifications for you as well. All right. Well, everybody, we are at
1:10:18
210. Um sorry we went over today 2026 prep. There’s just a lot of things that
1:10:23
we can cover. So, uh we just wanted to make sure that we provided you guys with the best information that we could just
1:10:29
to make sure you’re ready for 2026. If you um have any questions about anything
1:10:34
that we talked about um please reach out to our live chat support team. They’d be happy to take care of you. Um and uh we
1:10:41
will um definitely be posting a recording of this webinar on the YouTube channel in the next 24 hours. So take a
1:10:48
look at that if you did not have a chance to join us at the beginning. But we really appreciate you joining and
1:10:53
please sign up for Josh’s webinar in December on marketing and emails because it’s going to be awesome. All right,
1:10:58
everybody. Have a great day. Thank you to my panelists and uh co-hosts. Have a great day everybody. Yes. Thanks
1:11:04
everybody.
Memberships: Set your foundation
Memberships shape nearly every part of your CourtReserve setup — including who can book, what they pay, and how revenue is recognized. That’s why year-end prep should start here.
A quick review now helps you avoid renewal confusion, surprise pricing issues, or messy transitions once 2026 begins. Here’s your membership checklist.
Decide your new-year membership structure
Start by deciding how your memberships should behave when the calendar flips. In CourtReserve, most clubs fall into one of these three setups:
Recurring memberships that roll into the new year This option works best if your structure stays the same year to year. Members renew automatically on their normal cycle, and you can focus on light updates like pricing or billing rules.
Memberships you’re sunsetting at year-end Ideal if you’re retiring a tier or replacing your lineup. You’ll stop new purchases before the cutoff and set a clear end date so members don’t carry outdated options into the new year.
One-time “calendar-year” memberships Built for clubs that want an annual reset. Members buy a single, season-specific membership with defined start and end dates, then repurchase when the next year opens.
Bonus Tip:
If you want renewals to happen automatically, go recurring. If you want a clean annual re-enrollment, go one-time. If you’re changing your menu of options, sunset what needs to go.
If prices are changing, decide who it affects
When you update membership pricing, the biggest decision is who that new price applies to. In CourtReserve, you have two paths:
Apply the new price to everyone (existing + new members). Use this when you want a true across-the-board increase or adjustment.
Grandfather existing members and apply the new price only to new buyers. A good fit if you want to reward loyalty, avoid surprise increases, or phase pricing in gradually.
Bonus Tip:
If you want current members to renew at the new rate, make the change before their next billing cycle posts. Pricing updates affect future billing cycles — not ones that have already been generated.
Use ‘Update Existing Memberships’ to decide whether a new price hits current renewals or only future buyers.
Review your renewal guardrails
Before the year turns, confirm the rules that control what happens around renewals and missed payments. These settings protect your membership revenue and your player experience — especially during high-volume renewal season.
Take a minute to confirm your renewal safety nets are doing what you want them to do:
Grace period for past-due members Give members a short window to catch up before their status expires. This helps avoid accidental drop-offs over a missed email or busy week.
Auto-cancel window for non-payment Set a longer cutoff point where unpaid memberships automatically cancel, keeping your roster and reporting accurate.
Auto-reassign to a free or guest membership (optional, but smart) If someone is auto-canceled, you can move them into a free or limited tier instead of leaving them with no access at all. That way they can still log in, see what’s happening, and rejoin when they’re ready.
If you’re phasing out a membership, close it out right
If a membership tier isn’t carrying forward, take a few minutes to close it out. The goal is to prevent new purchases while letting current members finish their term, then end the membership on a clear cutoff.
Year-end sunset checklist:
Stop new purchases. Set a membership purchase end date so it disappears from the member portal when you’re ready to retire it.
Set a clear cutoff. Add a membership end date so existing members automatically roll off at the right time.
Plan the cutoff day correctly. End dates take effect at the start of the selected day, so choose a date that matches when you want access to stop.
Mass-apply carefully. If you’re updating end dates for everyone on that tier, use “update existing membership end dates” cautiously — as it affects all current holders.
Use Purchase End Date to stop new sign-ups, then set a Membership End Date (and only check Update Existing, if you want to mass-sunset current members).
Use mass updates when needed
If you’re making changes across a large member base, you don’t have to do it one profile at a time. CourtReserve gives you a few mass update tools to speed things up and keep your data consistent.
Mass update membership prices using filters (for example, adjusting only members under a certain price point).
CourtReserve Support helps with higher-impact moves:
Mass cancellations of memberships.
Mass changes or reassignments to a different membership type.
Financials: Get your books and reports ready
This section covers the key year-end financial checks in CourtReserve — clearing refunds, reviewing unpaid fees, running final invoices, and pulling the reports you’ll want for a organized close and a confident new-year start.
Here’s what you need to know:
Clear pending refunds
Before you close out the year, scan your Refunds page for anything still marked pending. Resolve what’s left — approve it or refuse it — so nothing hangs over into the next period.
Keeping refunds and their related fees in the same accounting window makes year-end reporting cleaner and helps you avoid mismatched revenue later.
Example of the Pending Refunds tab — review this list and clear any outstanding items.
If you use Batch Billing, run a final year cutoff
For clubs using Batch Billing, it’s worth doing one last batch that captures everything through the end of the year.
That cutoff keeps your records tidy and ensures your first batch in the new year only includes fees tied to the new season — not leftover activity from last year.
Run the Aged Fees report
Next, pull the Aged Fees report to see every unpaid balance as of the day you run it. If you want to focus your cleanup, filter for longer-outstanding fees (for example, members 60+ days past due).
From there, you have two simple paths:
Collect what you can by following up with members who still owe.
Void or write off what won’t be collected so those balances don’t carry into the new year.
The goal is to start the next season with a clean slate and accurate financials.
Example of the Aged Fees Report filters—use the Days Outstanding and Amount Due fields to zero in on long-past-due balances you want to collect or write off before year-end.
Export your CPA-ready reports
Before tax season (or your year-end financial review) hits, take a moment to export the two reports accountants will typically ask for:
Sales Summary Your high-level revenue snapshot. You can view it on a cash or accrual basis and choose different output types depending on how you want totals organized.
Transaction List Your detailed, line-by-line ledger for the full year. It’s the easiest way to pull raw transaction data, export it, and answer follow-up questions without digging through individual accounts.
Having both ready now makes the year-end handoff faster and easier.
Do a quick year-over-year check
Use reports to evaluate your club’s annual performance. Pull a Sales Summary for the full year, then compare it to last year’s report to see what changed.
You’ll spot:
where revenue grew or dipped,
which programs or revenue categories performed best,
and where to double down (or rethink) for the year ahead.
Even a five-minute comparison can surface trends that shape smarter planning.
Example of the Sales Summary report view — run it for the full year, then expand categories to compare this year vs. last year.
Court Costs: Plan ahead without breaking pricing
Court costs are a year-end priority because they impact every reservation your players make.
In CourtReserve, updates to your court cost table take effect immediately — they aren’t future-dated.
So the goal is to prep next year’s pricing in a way that protects today’s bookings while ensuring new-year reservations land at the right rate.
Use Custom Court Costs as a bridge
Since your main court cost table updates in real time, the easiest way to prep next-year pricing is to use Custom Court Costs as a temporary bridge. Create custom costs that apply to bookings in the early part of the new year, setting a clear date range for when those rates should kick in.
Then, once the calendar turns, you can update your standard court cost table to the new rates and remove the temporary custom costs. This gives you a distinct handoff from one year’s pricing to the next — without affecting current bookings.
Bonus Tip:
After you set custom costs, open a reservation on a future date (you don’t need to save it) to confirm the right rate is applying. It’s a fast way to validate pricing before players start booking.
Example of the Custom Court Costs setup screen — use it to set a short, future date range (like early January) so next-year rates apply to those bookings without changing today’s pricing.
Lessons + instructor setup: Reset for the new season
Lessons are easiest to manage when each year has its own setup. A quick refresh now ensures next-year bookings use the right pricing, pros stay aligned, and reporting stays separated and accurate.
Here’s the high-level checklist to get lessons — and Book-a-Pro scheduling — ready for a smooth transition.
Create new lesson types for the new year
The simplest way to keep lesson pricing tidy year over year is to create a fresh set of lesson types for the upcoming season.
That gives you a clear separation between last year’s rates and what you want to charge going forward — and it keeps instructor payouts and lesson reporting from blending together.
Assign new-year lessons to instructors
After your new lesson types are in place, make sure your instructors are connected to them and priced correctly.
Pros can only be booked for lesson types they’re eligible for, so this step is what ensures the right lessons — and rates — show up on their schedules when the new year starts.
Handle recurring lessons that cross into the new year
If you have recurring lesson series that run past the year boundary, decide how you want pricing to carry forward. You have two high-level options:
End the series at year-end and start a new one in the new year. This lets you book the new series under your new-year lesson types and pricing.
Keep the series and update pricing going forward. Useful if you don’t want to interrupt the schedule, but it requires a careful pricing update.
We recommended the first approach whenever possible, since it keeps accounting, reporting, and commissions easier to manage.
Refresh Book-a-Pro schedulers for the new year
If you use Book-a-Pro, take a quick pass here before the season turns. We recommend:
Ending your current-year scheduler so it stops showing and stops taking bookings after your cutoff date.
Creating a new-year scheduler tied to your new-year lesson types and pricing.
Double-checking your booking windows (how far in advance availability shows and how far out members can schedule) to make sure they match your policies.
Once you have more than one scheduler in place, players will see clear tabs in the portal — making it easy for them to book in the right season without confusion.
Example of Book a Pro’s time-based settings — use it to close out the current-year scheduler at your cutoff before creating a fresh one for the new season.
Events: Get pricing and programs ready
Take a moment to confirm your event lineup, make sure pricing is consistent, and set yourself up for easier reporting going forward — especially if you’re running multiple programs across different categories.
Here’s how:
Create year-end boundaries
As you set up next year’s programming, aim for a clear cutoff between seasons. The simplest approach is to let current-year events wrap at year-end, then create fresh events for the new year.
This avoids price overlap, keeps registration rules consistent, and prevents accidental updates to events that still belong to the prior season.
Use Mass Update Events when you need a reset
If you’re adjusting a lot of events at once, Mass Update Events is your shortcut. It lets you select a group of events and update key settings in one sweep, including:
Mass updates take effect right away. So if you include any events that are still happening this year, their pricing will change now, not just for the new year.
To avoid accidentally changing current-season events, make sure you only mass update next-season events — ideally after you’ve created a clean break between seasons (end this year’s events, then set up new-year events separately).
Start using Sessions tags for smoother event reporting
If you’re not tagging events with Sessions yet, this is a great year-end upgrade. Sessions let you group multiple events — even across different categories — under a single season or program label.
For example, you can tag clinics, leagues, and socials all under a “Winter Adult Programming” session. Then, when you run reports, you can filter by that session to see the full performance of the program in one place instead of piecing it together event by event.
Here’s what a Session tag looks like in your Events list — use the Session column to label each event with the right season or program for easier filtering and reporting.
Waivers: Start the year compliant
Check your waivers and confirm they still match your club’s policies. If you expect any updates, align with your legal or leadership team early so changes are in place — and ready for members to sign — before next year’s programming ramps up.
Create year-specific, date-based waivers
A simple best practice is to keep waivers specific to each season. Create a new waiver for the new year, then add an active date window so it only applies during that period.
That way, players signing up for next year’s programming are automatically prompted with the correct waiver, and your historical records stay accurate and easy to reference later.
Example of Waiver settings window — use the Start/End Date fields to limit a new-year waiver to that season only.
Set the right agreement period
When you publish your new waiver, double-check the agreement period setting. The recommended option is “every new disclosure version.”
This ensures that if you update your waiver mid-year, members will be prompted to re-sign the latest version the next time they log in — keeping you covered without manual follow-ups.
Member Portal: Make next-year programs easy to find
A quick portal refresh can make a big difference in how players experience the new season. This is your chance to tidy navigation and highlight next-year programming so members can find what they need fast — without extra front-desk questions.
Create filtered Event Views for player use
Event Filters let you create pre-filtered views of your programming — think “Winter Schedule” or “Adult Clinics” — then share them as direct links in your portal menu or header.
The payoff is simple: members click once and land on the right list of events without scrolling or searching. It’s an easy way to make next-year programming feel organized and easy to navigate from day one.
Example of a player-facing filtered Event View — members pick a filter and instantly see a tailored list without searching.
Consider keyword-based filters
You can also use Event Filters to surface programs that share a common keyword. If your events follow consistent naming (like camps, leagues, clinics, or drop-ins), a keyword filter instantly pulls them into one organized view.
This is a small setup step that keeps your portal tidy, helps members find what they’re looking for faster, and typically leads to fewer questions and smoother registration.
Video Transcript
0:00
hello everyone this is Ashley with court Reserve hope you guys are having a great
0:05
day I am so excited that you get to spend maybe even an hour with the guy
0:11
that’s going to be presenting today Josh is one of my favorite human beings on this Earth and he has been a rock star
0:18
at court reserve for the last year he when he came on board last year out of
0:24
anybody who’s ever come to work at court Reserve we always take them through the system and have them set up their own
0:29
test account kind of like you do when you’re in trial Josh actually made his member or player portal with music it
0:36
was amazing and so nobody better could be leading this webinar today now it’s
0:44
Josh’s first webinar so what we’re going to do today we of course are going to record this we’ll put it up in the court
0:49
Reserve YouTube channel if you have not subscribed to the court Reserve YouTube channel it is absolutely the best way to
0:55
keep up with all of the things that we’re putting out as well as I’m going to be helping um with the chat and the
1:02
Q&A so we’re going to take all of your questions at the end and so again make
1:07
sure that you put your questions as we go through uh Josh is going to flow through and today is going to be no
1:13
slides today is going to be him actually teaching you about the member portal we’re going to go through some Basics
1:19
he’s going to give tips and tricks and things that he actually does on a day-to-day basis would you not say Josh
1:26
there are probably there’s probably some most common practices you would like for people not to do
1:34
anymore all right I’m gonna stop my share so Josh can get started and I’m gonna come off camera and uh here we go
1:41
all right sweet well thank you Ashley for that very warm welcome and thank you guys for joining very excited today
1:48
we’re going to be going through like you said the member portal just some basic settings some tips and tricks some best
1:55
practices so hopefully there’ll be something for everyone to take away today mostly I’m going to be under settings on
2:02
the left down towards the bottom under portal settings website if I go anywhere
2:08
other than this I will let you guys know um but I’m just going to go through some of these settings show you guys some of
2:14
them what explain what they do some best practices so up here immediately you’ll
2:20
start on the general page and this is where you can set your colors the on the
2:26
left it’s all the background colors and on the right it’s all the Tex text colors make sure you pick a text color
2:33
that’s going to show well on the background color if you have a very light background color you don’t want a
2:40
very light text color you’re not going to be able to see it the other point I’ll make never use a
2:48
white base background color it won’t work well it’ll hide a lot of things never use a white based
2:56
background color other than that you guys have free use of whatever color you want in this there’s a color like
3:03
Spectrum there’s a wheel over here you can put in a hex code if you guys have specific colors like from your marketing
3:09
material that you want you can put that in here lots of customization you can do
3:15
just with the colors moving on down a little bit we have all of these website
3:20
links these all show at the very bottom of your footer on your member portal
3:26
I’ll go over and show you the member portal and show you where all this stuff is a little bit later but these links will generate a
3:33
little icon down there like the Facebook one will have the Facebook logo the Twitter one will have the Twitter logo
3:39
it might be updated to X now I’m not sure but whatever link you put in here if they click on that button it’ll take
3:44
you there if you leave it blank and you don’t have a link the icon will not show so you don’t have to worry about these
3:50
showing if you don’t have these accounts or anything like that set up next you
3:56
can have the hours of operation showing in your footer so if you don’t want people knowing what times you’re open
4:01
you can turn that off if you do open it up and it’ll pull the hours of operation
4:06
from the setting at the very top of the settings page I’ve seen pretty commonly that the
4:13
hours of operation that clubs have set there is not always when their bookings are available but those are the hours
4:19
that they want to show this is the place to do that so you’ll see you have this drop down menu and in this it pulls from
4:26
your custom schedulers so if you have a custom scheduler with Smalling smaller booking times than what your normal
4:34
hours of operations are this is going to be the way that you can change what it
4:39
displays down there in the footer and then you have a few other options what your font is it’ll give you
4:47
a quick preview of what the font is but I like to change it go over check make sure you like how it’s looking if you
4:53
need to adjust it come on back and change it again but it gives you a little preview of what that font will look like while you’re selecting it
5:00
next is you have the option of where to show the footer you can have it show on all the pages just on your homepage and
5:08
hiding the footer all together if you would like to do that and then you can
5:15
select how you want your announcements to be viewed these are from your Global announcements that can be found also at
5:21
the very top of the settings page under organization settings and this very last
5:27
one not a lot of people know knows this does but when you are looking at an
5:33
event from like the register page there can be a few different tabs there there isn’t always all of them but this is the
5:40
order that those show in so my registration will show the registration of the event that you are if there’s a
5:47
description there will be another tab registrant if you’re showing all the registrant for your event that will show
5:53
there and if it’s a recurring event all the dates will show and you can actually change the order uh that you want those
6:00
dates to show so if you really needed people to see the description you can move that to be first so that’s the
6:06
first thing they land on when looking at the event and you have that full customization there next we’re going to move on to the
6:13
homepage and this is where we’re going to be probably most of the time because this is what trips a lot of people up
6:19
and this is the bulk of where you set up what your website looks
6:24
like so actually I’ll jump over to my member portal now and show you a few examples so mine’s all wi sports themed
6:31
I know it’s goofy hopefully you guys can deal with that but we there’s a few different options that you have when
6:38
customizing your member portal um I’ll get into how to set all of these up but this one this very first
6:45
huge image you’re seeing is a hero row next we have the news row which is
6:51
automatically generated by Court reserve and then these are just content rows that I’ve set up and formatted and
6:59
customized to look a little bit different and then all the way down here at the bottom this is the footer and
7:05
these are the icons I was telling you about again if you don’t put a link in there these won’t show so let me hop
7:11
back over to the website settings and over to homepage and we’ll get started
7:16
with how this works so the main process is you create a row each of those little blocks that I
7:24
had on my member portal were a separate row and there are two different types of
7:29
rows there’s the hero row and the content row so when you go in and create the row we’ll start you have to put a
7:35
title in the title can be whatever you want it to be this is only admin facing so it’s best to be descriptive so that
7:42
you guys know what it is so if you come in to make changes you don’t have to go searching around for forever to find
7:48
what you’re trying to change and then you have the two different types again hero and content hero is that huge wide
7:56
wide image that I had that had the buttons across of it you can upload an image and then if you
8:02
want to you the text up here is the name of what will show and then you put the
8:09
URL this works pretty similar to those footer icons I was talking about we don’t put anything in here they won’t
8:16
show so if you only have two buttons it’ll only display the two there won’t be a third blank one you can change the
8:23
button style so this is whether it shows you here whether the button is hollow on the inside and when you hover over it
8:30
it fills with a color or if it’s filled with a color and then it just shows you on your cursor whether you’re ready to
8:36
click it or not you can change the color with the same color selector feature we
8:41
showed before and then the next step is to add the image so this is where hero rows can
8:49
be a little bit tricky because you need the Right image to put up in here so I
8:54
always recommend selecting a very wide and very
9:00
high resolution image so I’m going to throw one in here um you’ll see it’s just a pick a ball paddle and you can
9:06
customize like which part of the picture it’s selecting and how much of it it is
9:11
but you’ll notice this picture doesn’t really fit all that well which is fine I can work with this but keep that in mind
9:18
if you’re selecting something that if the picture is a lot taller than it is wider it’s probably not going to fit
9:23
well in here um and then once you confirm that it’s all good to go it’ll show you what
9:30
it’ll look like cropped out when you put this on the member portal there’ll be a
9:35
little like gray Hue over it it’ll be dialed down a little bit just so that
9:41
the buttons pop a little bit more so make sure the image itself is relatively
9:46
bright if you want the background to be able to be seen and then you have a few options
9:52
header subhe header I don’t see these used super commonly but if you want to add some text like welcome and a little
9:58
bit other information this is the place to do it so that’s all to the hero row
10:04
um there’s not a ton of customization to do but making sure you have a right image is very important next I move on
10:12
to the content row this is like your standard word editor you can type
10:18
whatever you want in here um you can upload images using this icon here it’ll
10:24
pull from your images that you have saved so if you have like a point of sale all of these images will be in here
10:31
every image you’re using elsewhere in court Reserve will show up here and you can always upload new ones with the
10:37
upload button up there um there are four few different formatting things so if
10:43
you want to have like different headers and different sized uh fonts you can do that with this
10:50
formatting you can also change that size manually here I found it’s a lot better to just use these because it formats a
10:57
little bit nicer but the rest of this I’m sure you guys are pretty familiar with with using like Google Docs
11:03
Microsoft Word stuff like that the other note I will make is with this icon here
11:10
you can put in custom HTML so if you or somebody you know knows how to use HTML and we don’t have the functionality with
11:18
this with these options to do what you want you can use custom HTML to do those things fortunately I can’t help you with
11:25
that I don’t know HTML that well but if you know someone that does awesome so you guys can customize this as much as
11:31
you want so I’m going to jump over to one of the rows I already have created
11:37
on my homepage this wi Sports one here um and you’ll notice I have an image
11:44
side by side with a bunch of text this I use the formatting to make it a heading
11:50
and then this is just the normal paragraph heading and you notice I have these boxes here now what I did with
11:56
this one is I added a table in to um better format
12:03
my uh content because if you don’t it can get a little bit challenging to manage it so this icon here allows you
12:10
to add in a table now it gives you this grid so you can choose how many um
12:17
columns and rows you want this is just a 1 by two table I don’t recommend
12:23
clicking right in here to insert the table this way I like going down to the table Wizard and specifying with this
12:30
because you’ll notice in down here at the bottom you have the option to choose the Border
12:36
style and that’s important because when you click just in here it defaults to
12:41
having a border style of I believe dotted or dashed I’m not exactly sure which one it is but what that means is
12:48
when I go over to the member portal I don’t know if you guys can see it all this well on your end but there is this
12:54
little outline that will display on the member portal if you come in to the T
12:59
Wizard and insert the table and you have the Border style set To None it will show in here to make your formatting
13:05
easier but once you get it set up and moved on to the member portal they won’t
13:11
actually see that so that’s important to keep in mind um apart from that it’s just I
13:17
inserted the image in here and played with how big it was same thing with the text I played with the formatting of it
13:22
a little bit I Chang the background color this will default to being whatever body background color color you
13:29
have under the general page but you can manually customize those once you have
13:36
your uh row set up it doesn’t automatically move over and start displaying on the member portal they
13:42
will only show here under available rows this doesn’t display anywhere which is a good thing so if you want to go in and
13:49
start playing with this start working on some content to put out you don’t need to have a display right away you can
13:55
take your time on it it’ll just store over here and until you hit the add button on any of these rows
14:03
here it doesn’t move over to this side so then once all of your rows are over
14:12
on your homepage side you can preview it to see what it looks like you’ll see this is pretty similar to what it looked
14:17
like when I went over to my member portal looks a little bit different doesn’t have the header or the footer in it but this is just showing you all the
14:23
information it’s a great way to quickly check what you have in but I do recommend going over to the member
14:29
portal using view member portal here at the top to see what’s going
14:36
on so that’s mainly the whole row creation process the other option you
14:43
have is with the display type so if you have a piece of information that you
14:48
only want people with Accounts at your organization to see with the display type you can do that by going to logged
14:55
in users only or if you want to provide some information to to the non-logged in users on how to get started with you
15:03
guys that’s the place to do that as well um so that’s it with the homepage next
15:09
is the rows this is just a list of all of the rows you have
15:15
created um you can create them in here you can create them on the homepage as
15:20
well they all go to the same place and this is where you can delete them too if you don’t want them to show
15:27
anymore page builder this works very similar to the homepage all you do is
15:32
you come in click this green create page button in the top right you give it a
15:38
name and then what it will do is automatically generate a link for you
15:43
and this works the same way as Rose so it creates this link but this doesn’t automatically go anywhere so I have an
15:50
about us page this is frequently used for frequently asked questions um
15:55
instructor pages I made a video a while ago on few different ways you can set up a page to add bios about your
16:01
instructors so this would be the place to do that as well but once you’ve created that page and it generates this
16:08
link if you come in to edit this works the same exact way that the homepage does where it shows you all the
16:15
available rows but it doesn’t actually display anything until you add it from the available row side to the about us
16:22
side and then you also have the same preview option where you can see this and again it just has this URL in
16:30
here the URL is up to you you can put this wherever you want so for me I
16:35
created this about us page and then I put it up in the header so this is just
16:40
part of my member portal you can see it up here I click it and it stay I stay on
16:46
my member portal and it shows the about us page that I’ve created it works the same way you create the rows and move
16:53
them over so next is news this is I should
16:59
have showed you guys while I was over on the member portal but this is automatically created by Court Reserve
17:05
this is already in here it’ll default to being on your homepage if you don’t want it you can delete it but if there’s no
17:11
content it won’t show but this allows you to create little articles it’s it works similarly
17:18
to Global announcements if you’ve used those um but it’s a little bit you you can provide a little bit more
17:24
information with these all you really need to do is come in Click the green create article button you give it a
17:31
headline and this is the main text that displays you can choose a display type so whether you want this to show again
17:37
to your logged in users or the folks that aren’t logged in the category this isn’t super important it’s
17:44
just a way to categorize them for you guys on your end I found most people using this just
17:50
write one called news in here and use it but if you are using this frequently it
17:55
might be helpful to categorize them out for you guys and then the active from and active to
18:01
date are if this is like you guys are advertising a tournament that you have coming up obviously doesn’t make sense to display that information after the
18:08
tournament is passed so you can set this to stop when your tournament has ended
18:15
sub headline this is just another line if you want to have an attention grabbing headline but you need some
18:21
information that you want to show primarily but not as bold as the
18:26
headline is you can use that here and then you also have the same content editor that we saw on the content
18:34
row and then also you can upload an image this doesn’t have to be as big and
18:40
as wide as the hero does but it should be a high resolution image I’ll show you
18:45
on my member portal now what this looks like so this here is what I put in for
18:51
the header you’ll see the image displays here on the left this is where the subheader displays and this is the date
18:59
that it was posted um if you click read more it’ll display this image and then all of the
19:06
content that you have typed in there next I’m going to be under the
19:11
menu tab this is where you can customize what is showing in that header so you
19:18
have the create header link option so you can put the display text is what will show and then the link URL is the
19:26
URL for that page so if you’ve created a page with the Page Builder and you want to display in your header you can copy
19:32
that URL here go over to the menu tab create the header link type in your
19:40
display name and then you can paste that URL in there this is also where you can
19:47
sort this menu um if you want to change the order that things display like you are really
19:54
proud of your leagues so you want those to be the first thing they see you can move that up there um you can move a few
20:01
of these options around not all of them display all the time but it’s good to
20:06
sort these in the order that you’ll think they’d be useful I think having Events book a pro and reservations
20:14
towards the front will be good because that’s what people are mainly using um and I will give a quick tip on that if
20:21
you are using the modern dashboard the order that reservations book a pro and events are in here is the order that
20:29
they will be in those call to action buttons that are on the new modern
20:34
dashboard um but yeah you’ll see I have another events in here I’ll get into
20:40
that why I have that in just a second but for now I’m going to move on to the footer links this will be a option for you to
20:48
add additional links on top of what you have here under the general tab into your footer these can be used for like
20:55
if you guys have um like a Google form that you need filled out or um like a
21:02
contact us page I use this a lot of I found a lot of clubs want to have their email on the footer and unfortunately
21:08
that’s not something we have as like a general option but what you can do is I have one called email and then if you
21:15
use this mail to link the same way I have it here make sure there’s no space
21:20
and it’s spelled this way with a colon then when they click on that it’ll automatically open whatever email
21:27
provider they use on their computer and start to make a draft for an email
21:32
to whatever email you have specified in here so this is a good tip and trick to
21:37
have this in here to make it easy for your members to email you guys um but
21:43
yeah those display at the very bottom in the footer it has the header links down here and then if you click on that it’ll
21:50
take them to that link but in this case it’ll open up to get them ready to email next under event filters so this
21:58
is this is one of my favorite tips to give out this is great for your members
22:03
it makes their life super easy I found that open plays are really really big
22:09
for a lot of clubs so they want to have a way so that their members can quickly get to just their open plays and this is
22:15
the place to do it so the way this works is you create the event filter you give it a name and then the navigation name
22:22
is what displays on the member portal um you can select a specific
22:28
specific categor so if you only want the open plays to be in here you can select that you can filter by tags days of week
22:35
dates things like that you can even do a pre-filled search so if you know if you look something up you’ll get the results
22:42
you want but you don’t have a categor category for it you can pre-fill a search in there um the other option or
22:49
setting that’s very important is this one show filters in the event tab on the member portal if you leave this on if
22:57
you hover over the events drop down this is going to display there so for a lot
23:02
of people they don’t really want it there they just want the link that this creates turn this off the events tab
23:10
will be unaffected but if you want it in here it’ll show and then once you save this it
23:16
generates a URL and you can take that URL and put it wherever you want whether it’s on an
23:24
external website you can put it in your header um you can put it in emails things like that and that’s what I have
23:31
this one set up here for so this is another common one I run into in support is folks want their events to show for
23:38
their Anonymous users currently we don’t have a setting for that so what I tell them to do set up an event filter
23:45
actually with no filters on it make sure you have this setting turned off take
23:50
that link that this generates put it in your menu for anonymous users only so
23:57
even though it looks like I have have two events here if I were to go over to my member portal you’ll only see the one
24:02
but if I log out they’ll have this option on there end where if they click they’ll get the list to all my events
24:07
it’s a common one I see um so that might be helpful for you guys next is
24:15
navigation um this is where you can hide certain things for certain memberships
24:21
on the member portal like if your guests can’t even go to events and you don’t want them to see it you can turn that
24:27
off for them few different options in here um the big one that I’ll point out is under here bucker Court navigation
24:34
name this will change what it says in the header when people go to reserve I
24:40
think by default it’s called reservations um keep in mind that if you create a one custom scheduler the name
24:48
of that will replace reservations but if you have multiple this will be the name of that dropdown not a lot of people
24:55
know where this lives so this is a good one um moving along to the logo pretty
25:01
simple you just upload your logo this will rep replace what’s in the footer and what’s in the top left when you
25:08
access the member portal make sure it doesn’t have to be clear but it’s
25:13
helpful if it is or if the background matches the color of your header otherwise there’ll be a white border
25:20
around it some people are okay with it for people that care a lot about design
25:25
it might frustrate them a little bit but this is where where you can up upload your logo and it’ll automatically
25:30
replace those things lastly the file repository this might not show in your
25:36
organization because for some of you it’s probably an add-on you just have to turn on under add-ons at the very bottom
25:42
but this is just a place where you can store any information that you want any documents um these don’t show anywhere
25:50
it’s just another place for you guys to safely store any documents that you need
25:55
so that’s it for the portal settings website tab there are a few other
26:00
settings that I wanted to point out up here at the top at organization settings
26:06
General um so phone number address and City and the postal code here this all
26:14
displays at the bottom of your footer and that’s where the information comes from so if you need to change that
26:19
information this is the place to do it um again there’s no email option here
26:25
that’s why I showed you how to do that mail to link so you can put it in the footer as well and then the other one
26:31
I’ll point out is by default events are called events in here I found a lot of folks are changing that recently so the
26:37
way you do that is under this page towards the very bottom alternate name for events this will change it on the
26:44
admin side but also on the member side as well so once you’ve gone through and
26:50
done all of your customization you want to go live or you want people to start signing up the place to really kick that
26:58
off is under settings portal settings setup so up here you have your link you
27:04
have two different types of Link this is just with the org ID at the end of it and then this one is whatever key you
27:11
put in here both of them will work whichever one you want to send out it’ll take them straight to your member portal
27:17
make sure that your member portal is turned on and if you want people signing up make sure you allow them to create
27:23
their account online um but this is where you can get that information out let people start
27:28
signing up once your member portal is turned on and allow members to create their account is turned online or is
27:36
turned on then they will be able to find you on the mobile app as well and then one other setting that I
27:43
always point out because we run into it probably once a day on support people ask why is my event not showing chances
27:50
are this setting here hi event dates more than x days out from appearing on the event list I believe this defaults
27:57
to like 30 I’ve never ran into someone that wants it to be 30 I usually recommend like 90
28:03
to 180 so if the number is lower than the amount of dates an event is away the
28:09
event just won’t show at all on the member portal doesn’t mean you’ve set anything up wrong with it this setting is just restricting it from showing so
28:16
for a lot of you guys I’d recommend going in and bumping this up a little bit just so you don’t run into that issue and then another one I’ll point
28:22
out is down towards the bottom the event list display type
28:28
um this defaults to grouped so if you have a recurring event with multiple dates they’ll all show under one block
28:35
on the event list if you change it to expanded each date will show as if it’s
28:40
its own event on the event list and then we’re almost to the end
28:46
here one last thing I’m going to point out I made mention of our mobile dashboard if you or modern dashboard if
28:54
you haven’t set that up yet I highly recommend looking into it not going to spend a ton of time going over that
29:00
today I’ll go through the basic setup there’s a ton of articles on it in our knowledge base and I highly recommend
29:06
switching over to it to start that process you’ll want to come over to settings portal settings this new mobile
29:13
option here if you aren’t set up with it this will probably be defaulted to based
29:19
on custom navigation or classic all you have to do is change it to Modern dashboard you can put in a short name if
29:26
you want to display your location and your weather you can do that there as well the weather is pulled from this ZIP
29:32
code so make sure your zip code’s correct or it’ll pull information from some random place and then you can do a
29:39
different color here as well but again highly recommend checking that out it looks a lot better in my opinion and
29:45
everyone that I’ve talked to has loved it so far so check it out and actually
29:51
that’s all I’ve got so oh wow I have learned so much already and I was here
29:57
when we devel veloped all this so the reason for the new modern dashboard on
30:02
the mobile app um is because the new reservation flow for your players is so
30:08
good so good so good so it makes it a lot easier and plus uh it just it just
30:14
looks prettier and cuter and all that so Josh we do have a couple of questions um thank you so much for going and showing
30:21
I think when you went to portal settings and we talked about how many days you could actually view the next event and
30:28
we changed that to 180 the reason that comes up for so many clubs is because they’ll put out a summer camp in J
30:36
January right and they’ll put the summer camp starting in June well if you have 30 or 60 or 90 days people can’t see
30:43
that so just knowing where that button is is great um I’ve also gone to our product team and asked them to please
30:50
under the general settings where we have address and phone number of your Club to also maybe put an email box there I love
30:57
your quick link um for email but if we can just attach a box there we’re
31:02
already working on it so let’s go through uh we only have four questions which means obviously you rocked it um
31:08
thank goodness Josh were you nervous at all I’m I was so nervous hey ladies and
31:16
gentlemen silent clap for Josh he can’t hear it but okay let’s go through some of these questions and this is going
31:22
back to like eight minutes after the hour so we were talking about hero row um any play on allowing sizing height
31:30
options on the hero row I guess he’s talking about probably that photo um yeah you’re pretty restricted
31:38
to um I’ll just go in and start creating one again you’re restricted to this aspect
31:46
ratio that you get in here the 96 by 31
31:51
it’s like I don’t know it’s hard to customize this because of the way it displays
31:58
I guess we probably could make it a little bit wider or taller taller yeah
32:04
but um I don’t I haven’t heard of any plans to fix that it’s a not a terrible suggestion but yeah I’ll definitely take
32:11
that um over to the product team and see if there’s any room for improvement on
32:17
that um so okay the next question um a test environment you know
32:24
um can you go into the where they can go and maybe create a row and kind ofe
32:30
where the preview button is we don’t have a test environment you know the thing about it is is once you’re a club
32:36
and you’re up and running um and you want to change things on your member portal when you do change them they kind
32:41
of go live and we don’t have a test environment we do have a way for you to kind of preview what it’s going to look
32:47
like um and Josh you can show them that um but again like we’re always taking your feedback um absolutely so go ahead
32:55
and show them kind of what you’re doing right now where you are yeah so I just went to the page builder because this is
33:02
a lot easier to not go live with than the hom Pages because if you add something over on your homepage it’s
33:08
going to be live so under the page builder I think I made note of this maybe not but it gives you this URL but
33:16
it doesn’t put this anywhere until you do so I could come in here now and make
33:22
one and put whatever I wanted in it it could look like crap and but no is gonna
33:28
see it because I can add whatever I want in here oh not the music when it’s going to get
33:33
loud um and then you can preview this see oh I don’t really like the order of this I
33:38
can switch it around I can change how all it looks but until I put this URL
33:43
somewhere this information isn’t displaying and it kind of goes the same way with the homepage except as soon as
33:50
you add it over it will start displaying but you can work on these rows as much as possible and I think that’s what
33:56
people miss a lot they think as soon as you make the row everyone can see it that’s not the case it’s not live until
34:02
you add it over to the homepage or you put that page live so what might be
34:07
helpful for you guys is start building out your homepage as a separate page and
34:14
then you can take this URL and open it up wherever no one else can see it except you as the person working
34:20
on that’s really good that’s good feedback um the next part of that question was it’d be nice to export all
34:27
the set to Archive them in case it becomes necessary to do a full restore um I don’t think you have to worry about
34:32
that John Court Reserve has redundant backups all the time and so no reason for you to keep that that’s that’s why
34:38
we’re here we are your backup so all right so Bonnie asked how do you create the side by side and I think when that
34:45
question came in and Bonnie you can correct me if I’m wrong is when Josh was on one of the rows and he was creating
34:52
the boxes side by side um can you just go over that and Bonnie if that’s incorrect let us know
34:58
right I actually meant to spend more time on this so I’m glad someone asked so um I’m just going to start filling
35:04
this out here it’s a Content row again what I did was I made a table you can do
35:09
it without the table it’s going to be much bigger paint so I like to put the
35:15
table in here again go to the table wizard make it a one by two or however
35:20
long you want it to be but again the table wizard so it doesn’t have that border around it and I did that
35:26
backwards so that’s great um 2 by
35:31
one so then it gives me this table that is side by side so then doesn’t
35:38
matter um which side the image goes on you guys have full customization of what this looks like I actually have one on
35:44
my member portal the one at the top is text on the left image on the right the next one is image on the left text on
35:51
the right feel free to do whatever but I will just click in here on the right
35:56
side of the table go into the insert image again this is pulling from all the
36:02
images you have uploaded anywhere in court Reserve or you can upload one from your computer I’m going to pick this
36:09
bowling one right here and you’ll see it automatically goes in this is a pretty good size so I might leave this one this
36:16
way and then you can start adding your words in here
36:22
um and whatever you say you can I think it always centers I don’t can’t remember
36:28
if there’s a way to change that you can have it Center or go like back to back with the alignment um I like left aline
36:36
the best but this is the way to do it and you can also do vertical Stacks so this is what um I did in the instructor
36:45
Pages video so I put in a table that was one wide and Too Tall so I put the image
36:53
of the instructor on the top and then their bio right below it again you guys have full customization of how this
36:59
looks and what it’s displaying but using that table was the the key for me on how
37:05
to cleanly organize it and I I will admit it takes a little bit of tweaking to get the size right like I probably
37:12
spent three or four minutes changing this one and I kind of don’t like how big it is now but yeah same same thing I
37:20
did here again you can do whichever side you want but yeah that’s how you do it
37:25
so I just want to let you know I I took Doug’s question earlier about changing the height um to our product team and
37:31
they said that they’re we’re working on in Q4 of this year going to do a full modern upgrade of the member portal and
37:37
get a better designer so that’s great information to look forward to I get to do it again I know right all right we
37:44
got a couple more questions um do the announcements come directly from Global announcements in court Reserve Josh yes
37:51
that is correct um one thing I will point out though is when you are creating a global announcement there you
37:59
can create them and it’ll show under the announcements button that you have but if you want it to show
38:05
in that little it’s got like bullet points and like it says the header make
38:11
sure you have include on welcome page on and also those of you on the modern dashboard this is this setting is how
38:17
you get to show on the modern dashboard as well I’ve run into that a few times already so make sure you have include on
38:22
welcome page selected but yes announcements pool straight from your global global announcements
38:28
and if you go and use the new modern dashboard um now you can do Global announcements from the app so instead of
38:35
having to pull up your laptop or your you know you’re on your way to the courts it’s raining and you want to throw a global announcement about the
38:41
rain you can actually do it from the your mobile device which is such a cool Improvement um I love it um all right we
38:48
have another question oh I love this question because I don’t think people understand enough about the difference
38:54
in Anonymous like they anonymous page for their because what do we all want to
38:59
do we all want to grow our clubs right we all want to get more members more players and so making your Anonymous
39:05
page really draw those people in I think it’s super important so this actually is
39:10
do I have to join do I have to have the word join membership and create account on my
39:16
homepage so tell talk to us a little bit about that Josh and why that’s there yeah so those come up when you are
39:24
logged out of your member portal so right now I’m in my Anonymous View and
39:30
these create account or login buttons are here I think this is what they’re
39:35
talking about I think so yeah these will always be here the login button you’ll
39:40
want that so people can get logged in create account you can turn this off but the only way to turn it off is to turn off account Creation with your
39:47
organization in general so unless you’re like an HOA or something I don’t really recommend that but um these follow the
39:55
one of the colors I think it’s the Basse background color um but unfortunately there’s no way to just remove them I
40:01
wouldn’t really recommend removing them anyway because they’re very helpful
40:06
um yeah did that answer it or did I misunderstood no I think so and if you
40:12
will actually log out and go to like um that was your Anonymous facing page right that means that your players
40:19
members who are not logged in can only see what you want them to see and you can actually make this look completely
40:25
different with different information than your members right so again joshh talked about a great way to just show
40:31
all of your events you know they can’t join any of your events but they sure want to right and so you know having the
40:37
ability to have two different you know p a public View and then a logged in view
40:43
is super important yeah and one thing I get asked a lot is how to set up like an anonymous
40:50
homepage it can be a little confusing to do that but it is possible if you change
40:55
all of the logged in pages to have the display type of logged in user and then you have other rows for the anonymous
41:02
view set to Anonymous users you can do that you’ll have to like really focus on
41:08
it because it can get confusing because all of them are stored here but it is
41:14
possible and now you know who to ask for in h support when you want help all
41:21
right we’ve got a couple more questions uh these are great questions uh let’s see challenges with formatted pages of
41:27
appearing differently on the mobile versus the web can you talk about that a little bit
41:32
Josh it is going to be a little different yeah that’s just the nature of the game really you can’t it because the
41:39
the screen is so much it’s taller and scrunched together so on the mobile app it’s just going to look different um
41:47
fortunately there’s not much you can do about it and we don’t really have much
41:52
um like there’s not a currently a way to create a page exclusively for the mobile app at
41:59
the moment maybe that’s what we tell them we want with the the new that’s right hey if you have great ideas about
42:07
what you need the product team loves your ideas and all you have to do is go out to chat support and say hey when you
42:13
guys redesign the you know our new you know develop or designer of our web
42:20
pages you know hey this is what I need can you do this um they love they love
42:25
all the ideas and that’s how courts was created and has been built we’re going to turn eight years old next month can
42:31
you believe it Josh eight years old Court Reserve almost as old as I am all right another
42:37
question this looks like the existing member portal can we see how this works with the new modern dashboard so the new
42:44
modern dashboard is only on the mobile app only on the player side correct Josh
42:51
yep admin side still looks the same yeah admin side still looks the same and it’s only on the mobile app and so if you
42:58
turn on the new modern dashboard then all of the pretty stuff that you’ve created um it it will it will apply to
43:05
that um so all right so I think we’ve gotten through all of our questions oh
43:11
maybe I’ve missed one uh yes Dwayne we are recording this and we’re going to put it up on the court Reserve YouTube channel give us you know till tomorrow
43:19
to do that it takes a little bit because sometimes we go in and you know we make it pretty and and everything so it will
43:24
be up um any other last minute tips Josh
43:29
that you can give folks about their member portal player
43:35
portal um yeah I would just say try and keep it simple um something I hear a lot
43:42
is my player base is super old I don’t want to do all this and I completely get it so you like mine has a lot of stuff
43:50
on it and it might be overwhelming so keep keep it as simple as possible and again this is all whatever you want to
43:56
do I would say make it pretty make it nice make it welcoming to your members but don’t feel the need to be super
44:02
extravagant with it um apart from that I think I went over all my tips and tricks so yeah that’s
44:09
good that’s good oh wait we just got three three questions I found this is how it goes you know this is this is
44:15
just chat support life all over again that’s right uh is there any way to test the modern dashboard before sighting to
44:21
change it or turn it on or not no there’s really not the best advice I can
44:26
give you about what the modern dashboard looks like um if you don’t know Tim and I opened our own pickle ball Club here
44:31
in St Augustine it’s called Old Coast pickleball you can actually go to your app store Google or iPhone download the
44:39
old Coast pickle ball app and you can become a non-member or a visitor it doesn’t cost you anything and you can
44:45
kind of see what the new modern dashboard looks like um that would be my best advice um we don’t care that you do
44:53
that um and that’ll be a good way just to kind of see what it looks like um and I’m telling you it’s sweet it really is
44:59
sweet um let’s see any plans on turning the idea board back on yes I have heard
45:05
there is a plan to do that um and then Laura asked what’s the difference in the
45:10
new modern dashboard or on the mobile version so we actually uh did a webinar
45:16
uh about what that looks like and what those differences are Lorna um it’s already up on the YouTube channel I
45:22
would highly recommend you go out and the reason I recommend is because you actually see screen shot of that we can’t show you screenshots of it today
45:29
but if you go out to that um I think it’s called is it branded mobile app or well there was one last Friday on all
45:36
the new features if you didn’t watch that it tells you all the new features we put out this summer and then the week before that was the Branded mobile app
45:43
and what that looks like as far as the modern dashboard I would highly recommend you just take a peek at that because it’ll give you the actual visual
45:49
part of what that looks like in the differences so well the last thing I want to bring
45:54
up is that you know usually once year we have a court Reserve education in person
46:00
um it’s called Catalyst and it’s kind of where we love getting you guys together
46:05
your front desk staff you as a director whoever you are at your Club to come on
46:10
site with us um and sit in a classroom style environment and learn for about two days the best part of that is the
46:17
networking you’ll do with other tennis and pickle ball and padel and badminton clubs and it just is really such great
46:22
learning uh we learn from each other um about best practices and so so we’re thinking about putting together the next
46:29
one either late this year or early next year and just trying to get a sense of who would be interested in coming we are
46:35
thinking about having it here in St Augustine Florida oldest city in the nation beautiful beach uh it’ll be nice
46:42
and warm in December if you are up in the north so if you’re interested in coming would you just throw a yeah I’d
46:48
be interested in the Q&A or the chat we’re just trying to get a an idea of people um who want to come because we
46:55
want to also think about doing a a track for new people coming on to court Reserve um as well as doing a track for
47:03
people who um maybe have been using Court reserve for a couple years and really want to Deep dive into financials
47:10
or even more member portal stuff with Josh so yeah you should come Josh this is
47:17
your official recorded invitation to come and teach you have to come teach though Josh
47:23
all right thank you guys so much um one last question oh oh wow we have a lot of
47:30
people interested all right one last question from John any plans to integrate the
47:37
Breo door access system John great news yes so um Tim
47:45
will probably kill me because I’m always telling him not to tell people things but he’s not on the call today uh so yes
47:51
we are actively pursuing the integration with Breo door locks um they seem to be
47:57
an amazing company with an amazing system and uh we’re actually doing that right now um so we’re really really
48:04
excited um about that as well so all right Josh great job first webinar in
48:10
the books we did it yeah was awesome thank you guys so much this will be up
48:15
on the court Reserve YouTube channel and we’ll see you soon
Communications: Updating players in the new year
Announcements, push, and text all play different roles, and a quick reset now ensures your messages land where they should — and when they matter most.
Here’s what to know channel by channel:
Consider Global Announcements for high-visibility updates
As part of your new-year prep, consider using Global Announcements for your first wave of 2026 member communication. These announcements show up front-and-center when players log in to your mobile app or member portal, so they’re an effective way to highlight what’s new.
Use them to post things like:
when new-season registration opens,
what programs or leagues are launching,
any schedule or policy reminders,
and weather/holiday closures.
This helps direct players to what matters most and keeps front-desk questions from stacking up.
CourtReserve mobile app home screen highlighting the Announcements section, where Global Announcements appear for members.
Turn on Push Notifications
If you haven’t enabled push alerts yet, add it to your new-year checklist. Once push notifications are turned on in your settings, you can send unlimited messages through your mobile app with no per-message cost.
They’re a strong channel for broad updates and marketing-style communication — think session launches, event reminders, last-minute openings, or general club news — because they reach players right on their phones without relying on email opens.
Use Text Messages intentionally
CourtReserve texts can come with added cost once you pass your plan’s limits, so they’re best reserved for high-urgency communication.
Use texts for things like last-minute cancellations, weather closures, or other updates players need to see immediately. For everything else, we recommend leaning on push notifications or global announcements.
Note how unsubscribes work
As you plan new-season announcements and promotions (especially if you rely on bulk messages), keep in mind that players control what they receive.
Players can unsubscribe from club communications on their side, including bulk emails, bulk texts, and bulk push notifications. When they do, admins generally can’t re-subscribe them from the back end — players need to re-enable communication themselves in their account or device settings.
They can also manage their system notification preferences (like confirmations and automated alerts) separately in their notification settings. If a player says they “stopped getting messages,” it’s usually because they’ve unsubscribed from bulk comms or turned off a notification type on their end.
This is all to say, assume a small segment won’t receive bulk comms. Use multiple channels (announcements + push + email), and be ready to direct members to re-subscribe if they say they’re not getting updates.
Get ready for the new year
A smooth new season doesn’t start in January — it starts with a little prep now. If you work through this checklist before the year turns, you’ll avoid the common pricing, renewal, and reporting headaches that tend to show up when members come back in full force.
Bookmark this playbook, share it with your team, and tackle it in pieces. Future you (and your front desk) will be glad you did.
Elevate & Engage: Kick-starting Success in Your New Pickleball Club
This comprehensive ebook is tailored specifically for club owners and facility managers. With actionable insights, practical advice, and industry secrets, you'll have everything you need to elevate your Pickleball club to new heights.
Simply give us your email below and we will send over the free guide instantly to your inbox!
Elevate & Engage
Unearth the secrets of creating an appealing and fully-equipped pickleball facility. Learn how to build a vibrant player base and develop enticing membership levels.
")